
Writer Guide 7.5
Chapter 17,
Fields
This document is Copyright © 2023 by the LibreOffice Documentation Team. Contributors are listed below. You may distribute it and/or modify it under the terms of either the GNU General Public License (https://www.gnu.org/licenses/gpl.html), version 3 or later, or the Creative Commons Attribution License (https://creativecommons.org/licenses/by/4.0/), version 4.0 or later.
All trademarks within this guide belong to their legitimate owners.
|
Jean Hollis Weber |
Kees Kriek |
|
|
Jean Hollis Weber |
Kees Kriek |
Bruce Byfield |
|
Barbara Duprey |
Gillian Polack |
Ron Faile Jr. |
|
John A Smith |
|
|
Please direct any comments or suggestions about this document to the Documentation Team’s forum at https://community.documentfoundation.org/c/documentation/loguides/ (registration is required) or send an email to: loguides@community.documentfoundation.org. Emails sent to the forum are moderated.
Note
Everything you send to a forum, including your email address and any other personal information that is written in the message, is publicly archived and cannot be deleted.
Published February 2023. Based on LibreOffice 7.5.
Some keystrokes and menu items are different on macOS from those used in Windows and Linux. The table below gives some common substitutions for the instructions in this document. For a detailed list, see the application Help.
|
Windows or Linux |
macOS equivalent |
Effect |
|
Tools > Options |
LibreOffice > Preferences |
Access setup options |
|
Right-click |
Control+click or right-click depending on computer setup |
Open a context menu |
|
Ctrl (Control) |
⌘ (Command) |
Used with other keys |
|
Alt |
⌥ (Option) or Alt, depending on keyboard |
Used with other keys |
|
F11 |
⌘+T |
Open Styles deck in Sidebar |
Fields are used for a variety of purposes: for example, data that changes (such as the current date or the total number of pages) or might change (the name of a product or book under development), user-defined numbering sequences, automatic cross-references, and conditional content (words or paragraphs that are visible or printed in some conditions but not others). Index entries are also fields.
This chapter describes some common uses of fields. A full discussion of fields and their use is beyond the scope of this book. Power users can find more details in the application Help.
Tip
Fields have a gray background when viewed on screen, unless you have deselected View > Field shadings on the Menu bar or changed the color of field shadings in Tools > Options > LibreOffice > Application Colors. This gray background does not show when you print the file or export to PDF.
Here are some handy keyboard shortcuts to use when working with fields:
|
Ctrl+F2 |
|
|
Ctrl+F8 |
|
|
Ctrl+F9 |
|
|
F9 |
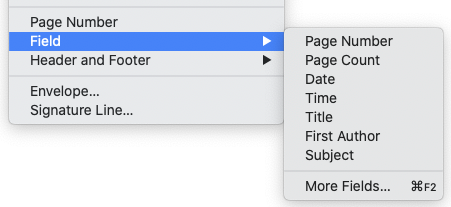
To quickly insert common fields into your document, choose Insert > Page Number or Insert > Field on the Menu bar and selecting the required field in the submenu.
Figure 1: Inserting common fields
The Properties dialog (File > Properties) for a document has six tabs. The information on the General tab and the Statistics tab is generated by the program. Some information (the name of the person on the Created and Modified lines of the General tab) is derived from the User Data page in Tools > Options > LibreOffice. The options on the Font and Security tabs are discussed elsewhere in this book.
Use the Description and Custom Properties tabs for:
Metadata to assist in classifying, sorting, storing, and retrieving documents. Some of this metadata is exported to the closest equivalent in HTML and PDF; some fields have no equivalent and are not exported.
Information that changes. You can store data for use in fields in your document; for example, the title of the document, contact information for a project participant, or the name of a product might change during the course of a project.
This dialog can be used in a template, where the field names can serve as reminders to writers of information they need to include. (Placeholders can serve a similar function within the text; see page below.)
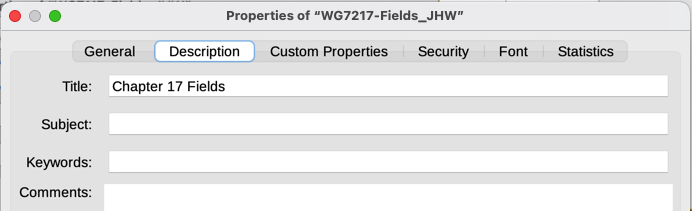
You can return to this dialog at any time and change the information you entered. When you do so, all of the references to that information will change wherever they appear in the document. For example, on the Description tab (Figure 2) you might need to change the contents of the Title field from the draft title to the production title.
Figure 2: The Description tab of the document’s Properties dialog
Use the Custom Properties tab (Figure 3) to store information that does not fit into the fields supplied on the other tabs of this dialog.
Figure 3: Custom Properties tab
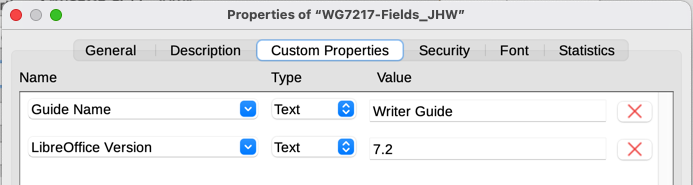
When the Custom Properties tab is first opened in a new document, it may be blank. If the new document is based on a template, this tab may contain fields.
Click the Add Property button in the lower right of the tab (not shown in illustration) to insert a row of boxes where you can enter your custom properties.
The Name box includes a drop-down list of typical choices; scroll down to see all the choices. If none of the choices meet your needs, you can type a new name into the box.
In the Type column, you can choose from Text, DateTime, Date, Duration, Number, or Yes or no for each field. You cannot create new types.
In the Value column, type or select what you want to appear in the document where this field is used. Choices may be limited to specific data types depending on the selection in the Type column; for example, if the Type selection is Date, the Value for that property is limited to a date.
To remove a custom property, click the button at the right-hand end of the row.
Tip
To change the format of the Date value, go to Tools > Options > Language Settings > Languages and change the Locale setting.
One way that people use fields is to hold information that is likely to change during the course of a project. For example, the name of a manager, a product, or even your entire company may change. If you have inserted the changeable information as fields, you can change the information in one place, and it will automatically change in all the places where that field occurs.
Writer provides several places where you can store the information referred to by a field. We will look at some of them here.
Seven document properties (Page Number, Page Count, Date, Time, Title, First Author, and Subject) are on the Insert > Field menu (Figure 1). To insert one of these fields, click it in the menu. Some of these fields get their information from the Document Properties dialog (Figure 2).
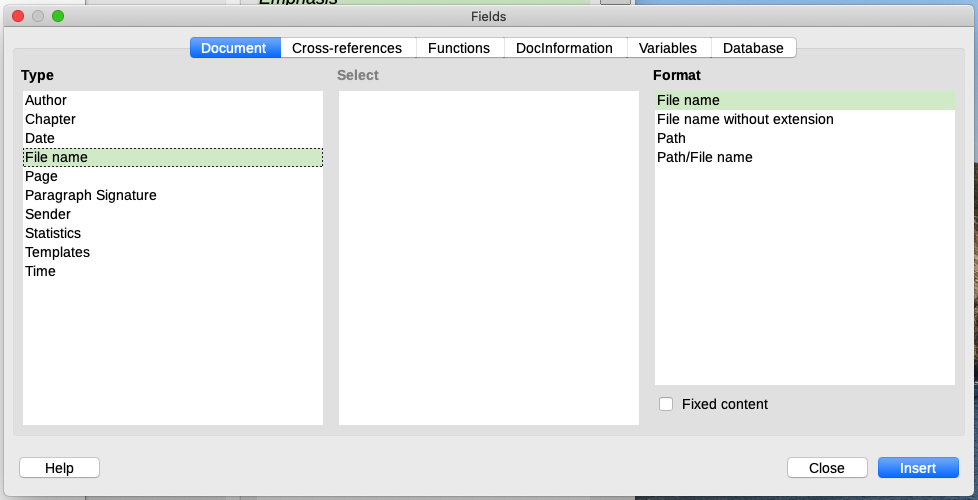
Other document properties are on the DocInformation and Document tabs of the Fields dialog (Figures 4 and 5), reached by choosing Insert > Field > More Fields or pressing Ctrl+F2.
The Custom item in the Type list on the DocInformation tab is derived from the Custom Properties tab of the Document Properties dialog (Figure 3); it does not appear on the list if no custom properties have been defined.
Some of the field values are picked up from the User Data page of the Tools > Options > LibreOffice dialog, so make sure the information on that page is correct.
To insert one of these fields, select it in the Type list and then select in the Select and Format lists if choices appear. Finally, click Insert.
Figure 4: Inserting a Date Modified field using the DocInformation tab of the Fields dialog

Figure 5: Inserting a File name field using the Document tab of the Fields dialog
Tip
You can make the content fixed by selecting Fixed content (see Figure 4, lower right) when inserting the field. If necessary, you can come back to this dialog later and deselect this option to make the field variable again. For example, if you use a field to insert the creation date of a document, you do not want that date to change.
If you use the same fields often, you can use AutoText as a quick and easy way to insert them.
To define an AutoText entry for a field:
1) Insert a field into your document, as described previously.
2) Select the field you inserted, and then choose Tools > AutoText (or press Ctrl+F3).
Figure 6: Creating a new AutoText entry
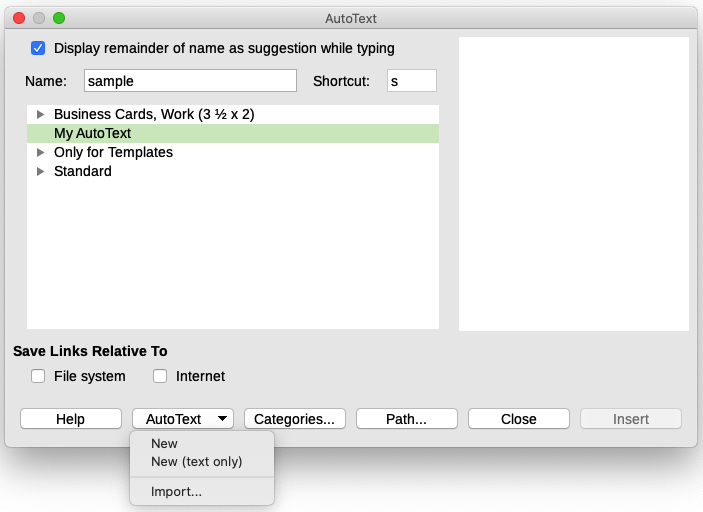
3) On the AutoText dialog (Figure 6), choose the group where this new entry will be stored (in this example, My AutoText), type a name for the entry, and change the suggested shortcut if you wish.
4) Click the AutoText button and click New to have the entry inserted as a field. Do not choose New (text only) because the AutoText entry will be plain text, not a field. (The New selections do not appear until you have selected a group and typed a name for the entry.)
5) Click Close to close the AutoText dialog.
To insert this field at the cursor position, type the shortcut and press F3.
You may want to define your own numbering sequences to use in situations where you do not always want the number at the start of the paragraph, or where you want more control than the built-in numbering choices give you, or where list styles do not do what you want.
This topic describes how to create a numbering sequence, using a number range variable field.
To create a number range variable using Arabic (1 2 3) numbers:
1) Position the cursor in a blank paragraph in your document.
2) Choose Insert > Field > More Fields or press Ctrl+F2, then select the Variables tab (Figure 7).
Figure 7: Defining a number range variable

3) In the Type list, select Number range. In the Format list, select Arabic (1 2 3). Type whatever you want in the Name field. (We have used Step in this example.)
4) Click Insert. The name of the variable (Step) now appears in the Selection list, and a number field (showing 1) appears at the insertion point in your document. The Fields dialog remains open.
5) If you click several more times on the Insert button in the Fields dialog, the numbers 2, 3, 4, and so on will appear in the document.
6) You can now delete the fields you inserted; the Step sequence remains in the Select box in the Fields dialog (in this document only). You can insert this field at any place in the document.
Tip
To avoid doing all of that every time you want to put in a Step number, create an AutoText entry for Step. Then you can insert the field in the same way you would insert any other AutoText. See “Using AutoText to insert often-used fields” above.
Tip
If a user-defined variable is not in use in the document, the X icon next to the Value box is active. You can delete the variable by clicking this icon. To remove a variable that is used in the current document, first delete from the document all fields using that variable, and then remove the variable from the list.
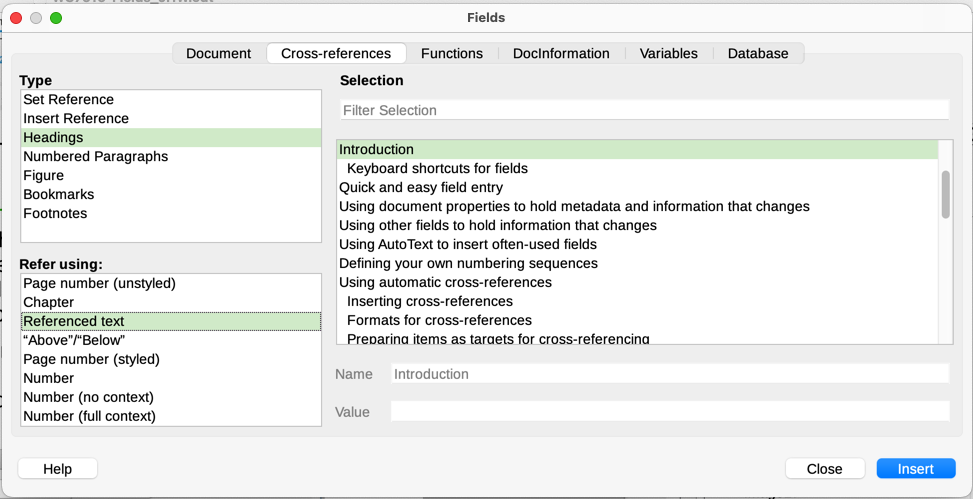
If you type in cross-references to other parts of the document, those references can easily get out of date if you reword a heading, add or remove figures, or reorganize topics. Replace any typed cross-references with automatic ones and all the references will update automatically to show the current wording or page/figure/table numbers.
The Cross-references tab of the Fields dialog (Figure 8) lists some items, such as headings, numbered paragraphs, and bookmarks. If figure captions, table captions, user-defined number range variables, and some other items have been defined in a document, that type also appears in the list.
You can shorten the list of items shown in the Selection box if you know a word or phrase that appears in the item required: type the word or phrase in the Filter Selection box.
Figure 8: The Cross-references tab of the Fields dialog
Tip
Some people use Writer’s Hyperlink feature for cross-references. However, the visible text of the hyperlink does not change if you change the text of the item to which it links. For that reason, you may wish to use cross-references in most situations. The exception is when the document is to be saved as HTML; cross-references do not become hyperlinks in a HTML document, so you need to use hyperlinks in the Writer document.
To insert a cross-reference to a heading, figure, or other item shown on the Cross-references tab:
1) Place the cursor where you want the cross-reference to appear in the document.
2) If the Fields dialog is not open, choose Insert > Cross-reference or press Ctrl+F2. On the Cross-references tab (Figure 8), in the Type list, click the type of item you are referencing (for example, Headings or Figure).
3) Click the required item in the Selection list, which shows both automatically created entries (for example, Headings) and user-defined references (for example, bookmarks).
4) In the Refer using list, choose the type of reference required. The choices vary with the item being referenced (see “Formats for cross-references” below).
5) Click Insert.
For all types of cross-reference, you can select from the following formats:
Page number (unstyled): the page number of the target, without using formatting specified in the page style.
Chapter: the number of the chapter where the referenced target is located.
Referenced text: the full text set as a reference or bookmark.
“Above”/“Below”: the word above or below depending on the position of the field relative to the referenced target.
Page number (styled): the page number of the target, using the formatting specified in the page style. This is very useful when putting a reference to a page in the front matter where roman numerals are usually employed.
For headings or numbered paragraphs, three additional options are available:
Number: Inserts the number of the heading or numbered paragraph, including superior levels depending on the context.
Number (no context): inserts only the number of the heading or of the numbered paragraph. For example, if referencing a numbered item 2.4, it inserts 4.
Number (full context): inserts the full number including higher hierarchical levels. For example, if referencing a numbered item 2.4, the full numbering (2.4) is inserted.
For objects inserted with captions such as a table or a figure, you can also choose:
Category and Number: inserts both the category and number of the referenced object (for example, Figure 6). This is the most used formatting for figures and tables.
Caption Text: inserts the full caption of the referenced object. For example, Figure 6: This is an example figure.
Numbering: inserts the sequential number of the referenced object, without the category (for example, if referencing Table 2, the field will contain only the number 2).
If you want to insert a cross-reference to something that is not automatically shown on the Cross-references tab, for example an illustration without a caption or an item in a bullet list, you must first prepare the item as a target to be referenced. To do this, you can use a bookmark or set a reference. After a target has been defined, you can cross-reference to it as described in “Inserting cross-references” above.
Note
Both bookmarks and set references can now be used for either location or text. In previous versions of LibreOffice, bookmarks could be used only for location references.
Bookmarks are listed in the Navigator and can be accessed directly from there. In HTML documents, bookmarks are converted to anchors that you can jump to using a hyperlink.
See “Managing bookmarks” below for more information about bookmarks, including renaming and editing them.
1) Select the text you want to bookmark, or click in the required place in the text. Choose Insert > Bookmark on the Menu bar.
2) On the Bookmark dialog (Figure 16), the larger box lists any previously defined bookmarks. Type a name for this new bookmark in the top box (or accept the default name) and click Insert.
3) You can leave the Bookmark dialog open while you insert more bookmarks. When you are done, click Close.
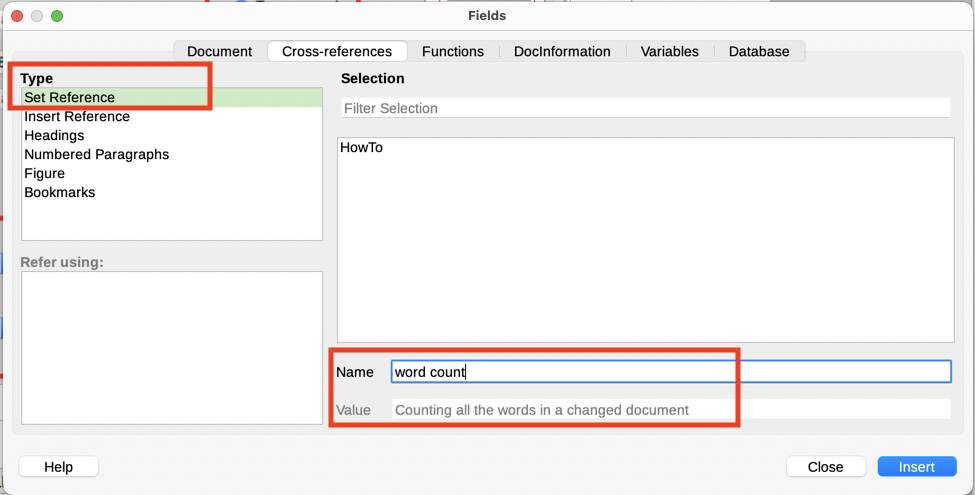
Set references are inserted and managed on the Cross-references tab of the Fields dialog.
1) Select the text you want to bookmark, or click in the required place in the text. Choose Insert > Cross-reference on the Menu bar.
2) On the Cross-references tab of the Fields dialog (Figure 9), select Set Reference in the Type list. The Selection list now shows any references that have been defined. This dialog can remain open while you set several items as references.
3) The text of the item appears in the Value box in the lower right of the dialog. In the Name box, type some text by which you can identify this item. This field name is case-sensitive.
4) Click Insert. The text you typed in the Name box now appears in the Selection list.
5) Repeat steps 3 and 4 as often as required.
6) Click Close to save and exit the dialog.
Figure 9: Setting text to be used as a target for a cross-reference
You might want to include automatically updated cross-references between subdocuments in a master document. This topic describes how to do this using set references. The process is similar when using bookmarks.
Follow the procedure described in “Preparing items as targets for cross-referencing” above for all items to be targets of cross-references. In this case you need to include headings, figure captions, and other items, because they will not be listed automatically as they are for items within one document.
Tip
Keep a list of your names for the reference fields, and be sure each name is unique – not just within one document, but for all the documents involved. One way to keep track of this information is to save it in a separate file or spreadsheet.
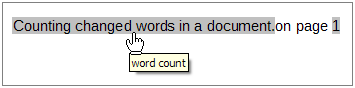
The field names are case-sensitive. You can check the field name by holding the mouse pointer over the referenced item. For example, in Figure 10 the heading has the field name word count.
Figure 10: Finding the field name for a set reference

1) In the document, place the cursor where you want the cross-reference to appear. Click Insert > Cross Reference.
2) On the Cross-references tab of the Fields dialog (Figure 11), select Insert Reference in the Type list on the left. Select Referenced text in the Refer using list.
Figure 11: Fields dialog showing manual entry of field name
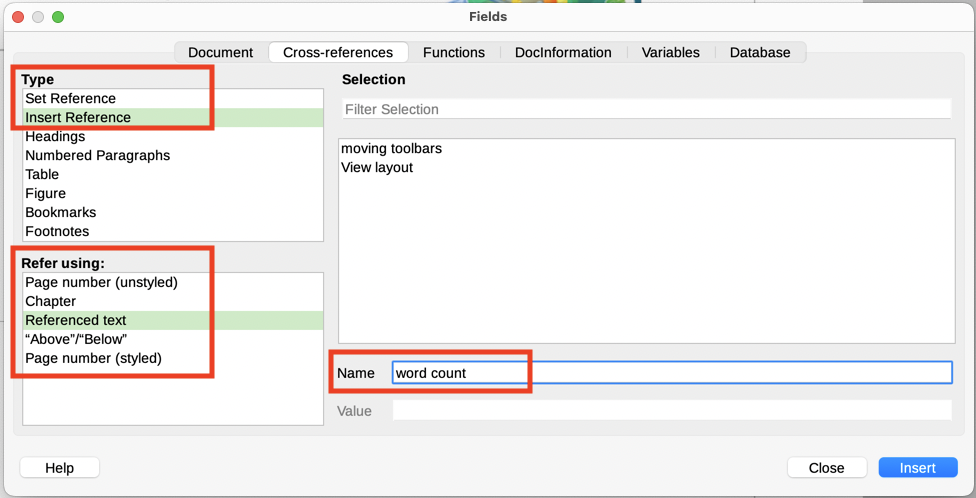
3) The Selection list on the right shows only the reference field names (if any) for the subdocument you are using, so ignore that list and check the list you created manually in “Preparing the references” above. In the Name field in the lower right, type the name of the reference you set in the subdocument you are referring to. In our example, the name of the reference is word count.
4) Click Insert, type any text you want to appear between the reference and page number (such as “on page ”), and then insert another reference with Page number (unstyled) in the Refer using list. The cross-references will show an error as shown in Figure 12. When you hover the mouse pointer over one of these fields, you will see the field name.
(You can turn on the display of field codes by clicking View > Field Names. The two error fields shown in Figure 12 now look like Figure 13.)
5) After you have inserted all the cross-references required in the subdocument, click Close to save it and return to the master document window.
Figure 12: Viewing the field name

Figure 13: Displaying field codes

6) Select Tools > Update > Links on the Menu bar, or click Update > Links in the Navigator. All the edits in the master document will now show. Within the master document, navigate to the page of the subdocument on which you inserted the cross-reference field.
You should now see the text of the cross-reference appear in the spot where you inserted it. If it does not work, save the master document, close it, and open it again, updating the links. (If you open the subdocument for editing, the error message in Figure 12 will be shown.)
Figure 14: Field contents visible
This technique also works if you open a subdocument directly in step 2 (that is, not from within the master document) and insert a cross-reference field.
You can insert fields into headers or footers, using techniques described earlier in this chapter:
To insert a page number, document title, author, creation date and time, current date and time, or total page count field, use Document Properties (see page above) or choose Insert > Field > [item] on the Menu bar.
To insert a cross-reference to a bookmark, heading, or other item, you can use Insert > Cross-reference or Insert > Field > More Fields > Cross-references (tab).
If you have used Heading 1 for your chapter titles, you can use a Document field to insert the current chapter title, so the header or footer contents change from one chapter to the next. See Figure 15. (Writer calls chapter titles Chapter names.) If you have used outline numbering on your Heading 1, you can choose whether to include these numbers in the field (Chapter number and name). Use Insert > Field > More Fields > Document.
Figure 15: Inserting the current chapter number and name into your document

You can insert cross-references to other heading levels by specifying a value in the Level box in the lower right of the Document tab of the Fields dialog (Figure 15). That is, Level 1 = Heading 1, Level 2 = Heading 2, and so on.
Note
A cross-reference field in the header of a page picks up the first heading of that level on the page. A field in the footer picks up the last heading of that level on the page.
You can add a page count to the footer; for example, Page 9 of 12. Type the word Page and a space in front of the Page field. Type a space, the word of, and a space after the Page field. Then choose Insert > Field > Page Count.
To include the chapter number with the page number:
1) Position the cursor just before the Page field you inserted. On the Document tab of the Fields dialog, select Chapter in the Type column and Chapter number without separator in the Format column. Click Insert.
2) Go to the header or footer where you inserted this field and type the character you want to appear between the chapter number and the page number; for example, a hyphen.
3) The table of contents will not automatically pick up these chapter numbers, so you need to make a change on the Entries tab of the Table of Contents, Index or Bibliography dialog, as described in Chapter 15, Tables of Contents, Indexes, Bibliographies.
Bookmarks have been enhanced in LibreOffice 7.5. In previous versions, bookmarks could be used only for location references. Now they also can be used for text references.
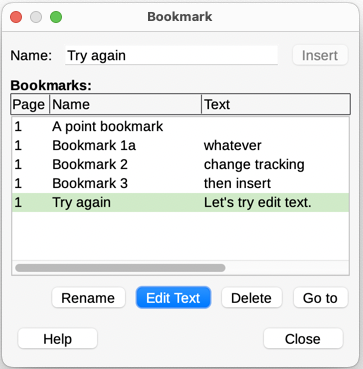
Text enclosed by a bookmark can be edited in the Bookmark dialog (Figure 16) as well as in the document itself. When you edit text in the dialog, it is also edited in the document. If you have change tracking on, the change is tracked in the document.
To use the Bookmark dialog to edit the text of a bookmark:
1) Open the Bookmarks list in the Navigator, right-click on the name of a bookmark, and select Edit in the context menu. The Bookmark dialog opens with that bookmark selected. You can select any bookmark in the list when the dialog is open.
2) With the required bookmark selected, click the Edit Text button. The text of the selected bookmark is highlighted in the Text column.
3) Click in the highlighted text in the dialog to edit it. Click Close when done.
Figure 16: Bookmark dialog
To edit the name of a bookmark, you can right-click it in the Navigator and select Rename in the context menu, or you can select it in the Bookmark dialog and click the Rename button. A small dialog opens. Type the new name, or edit the existing name, and click OK to save.
To locate a bookmark in the document, you can right-click it in the Navigator and select Go to in the context menu, or you can select it in the Bookmark dialog and click the Go to button. The cursor jumps to the bookmark’s location, with the bookmark highlighted.
Other bookmark enhancements are for metadata visualization, accessibility, and visibility of bookmark locations in a document. For details on those features, see the release notes, https://wiki.documentfoundation.org/ReleaseNotes/7.5#Bookmarks
Conditional content is text and graphics that are included or excluded from a document depending on a condition you specify.
A simple example is a reminder letter for an overdue account. The first and second reminders might have a subject line of “Reminder Notice”, but the third reminder letter might have the subject “Final Notice” and a different final paragraph.
A more complex example is a software manual for a product that comes in two versions, Pro and Lite. Both product versions have much in common, but the Pro version includes some features that are not in the Lite version. If you use conditional content, you can maintain one file containing information for both versions and print (or create online help) customized for each version. You do not have to maintain two sets of the information that is the same for both versions, so you will not forget to update both versions when something changes.
Tip
In some cases, the same effect can be obtained by hiding a paragraph or character style; see Chapter 9, Working with Styles.
This section describes several Writer features that can help you design and maintain conditional content. You can use one or any combination of these features in the same document.
Conditions are what programmers call logical expressions. You must formulate a logical expression for each condition because a condition is always either true (met) or false (not met). You can use the same condition in many places in your document, for different types of conditional content.
To make conditional content work, you need to choose or define a variable and define a logical expression (condition) involving the selected variable.
You can use the following variables in your condition:
User-defined variables
Predefined LibreOffice variables, which use statistical values from the document properties
User data
Database field contents—for example, from your address book
You cannot use internal variables (for example, page number or chapter name) to formulate conditions.
The condition compares a specified fixed value with the contents of a variable or database field.
To formulate a condition, use the same elements as you would to create a formula: operators, mathematical and statistical functions, number formats, variables, and constants. The possible operators, and many examples of use, are given in the Help. You can define quite complex expressions, but in most cases a simple condition will do the job.
To create the variable, you can use choices found on the DocInformation, Variables, and Database tabs of the Fields dialog.
“Using document properties to hold metadata and information that changes” above described how to set up a custom document property. You can use that document property as the variable in your condition statement.
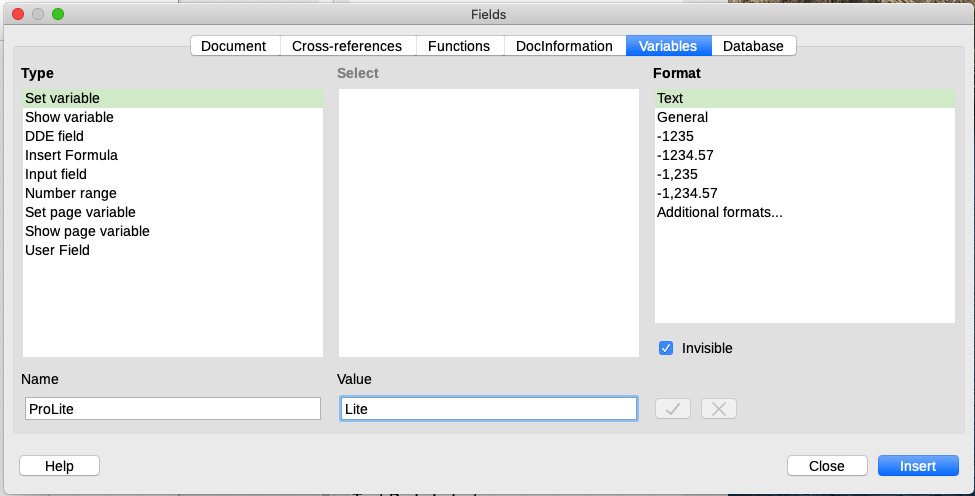
To set up a variable or user field:
1) Place the cursor where you want the field to be inserted.
2) On the Fields dialog, select the Variables tab (Figure 17).
3) Select Set variable in the Type list and Text in the Format list. Type a name for the variable in the Name box, and a value in the Value box. In this example ProLite is chosen for the name (as a reminder that this variable is related to the two product versions), and the value is set as Lite to remember “If it is the Lite version, then this text should be hidden.”
4) Select Invisible so the field does not show in the document. Click Insert, then click Close. A small gray mark will appear where you inserted the field.
Figure 17: Defining a variable to use with conditional content
Tip
Because the gray mark is so small, you may have trouble finding it again, especially if you have other fields in the document. You may prefer to leave the variable field visible while you work, and change it to invisible just before you create final copy.
At any time, you can place the insertion point just before the field and choose Edit > Fields or right-click the field and choose Fields in the context menu. On the Edit Fields dialog (Figure 22), select or deselect Invisible.
Now that you have defined the variable, you can use it in a condition statement. This topic describes some of the possibilities.
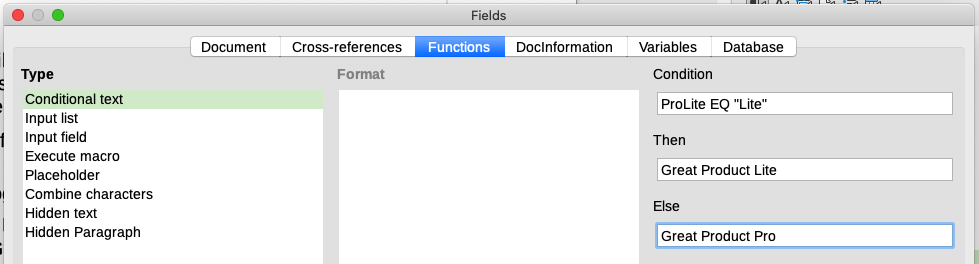
First, let us set up some conditional text that will insert the words Great Product Lite into the Lite version and Great Product Pro into the Pro version of the manual. You would use this field whenever you want to mention the name of the product.
1) Place the cursor where you want one of these phrases to appear. (You can move or delete it later, if you wish.)
2) On the Functions tab of the Fields dialog, select Conditional text in the Type list.
3) As shown in Figure 18, type ProLite EQ "Lite" in the Condition box, Great Product Lite in the Then box, and Great Product Pro in the Else box.
Note
These fields are case-sensitive, and quotation marks are required around a text value such as Lite.
4) Click Insert to insert the field, then click Close. You should see Great Product Lite in the text.
Figure 18: Inserting conditional text
Tip
If you want to insert this field into your text in many places (as you probably would for a product name), create an AutoText entry for it. See “Using AutoText to insert often-used fields” above for instructions.
You might use hidden text for words or short phrases that describe features of Great Product Pro that are not found in the Lite version. You can reuse the same field in several places in the document—for example, by copying and pasting it. To create a hidden text field:
1) On the Functions tab of the Fields dialog, select Hidden text in the Type list (Figure 19).
Figure 19: Creating a condition for hidden text
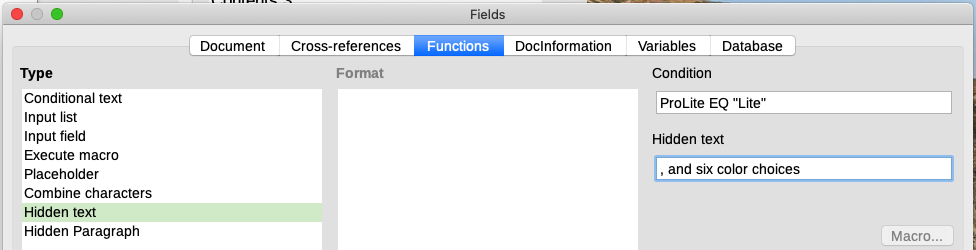
2) Type ProLite EQ "Lite" in the Condition box and type the required text in the Hidden text box. Remember, this is the text that is hidden if the condition is true.
3) Click Insert to create and insert the field.
To show all hidden text so you can edit it, do one of the following:
On the Tools > Options > LibreOffice Writer > View page, select the Display fields: Hidden text option.
Double-click in front of the variable that you used to define the condition for hiding the text, and enter a different value for the variable.
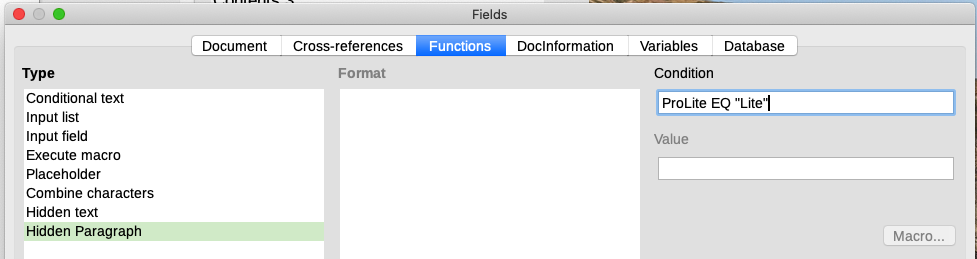
A conditional paragraph is hidden if the condition is true. To hide a paragraph:
1) Click in the paragraph to be hidden.
2) On the Functions tab (Figure 20) of the Fields dialog, select Hidden Paragraph in the Type list.
3) For this example, type ProLite EQ "Lite" in the Condition box.
4) Click Insert to create and insert the field.
Figure 20: Creating a condition for a a hidden paragraph
To show all hidden paragraphs so you can edit them, do one of the following:
Choose View > Field Hidden Paragraphs on the Menu bar.
On the Tools > Options > LibreOffice Writer > View page, select the Display Fields: Hidden paragraphs option.
Double-click in front of the variable that you used to define the condition for hiding the paragraph, and enter a different value for the variable.
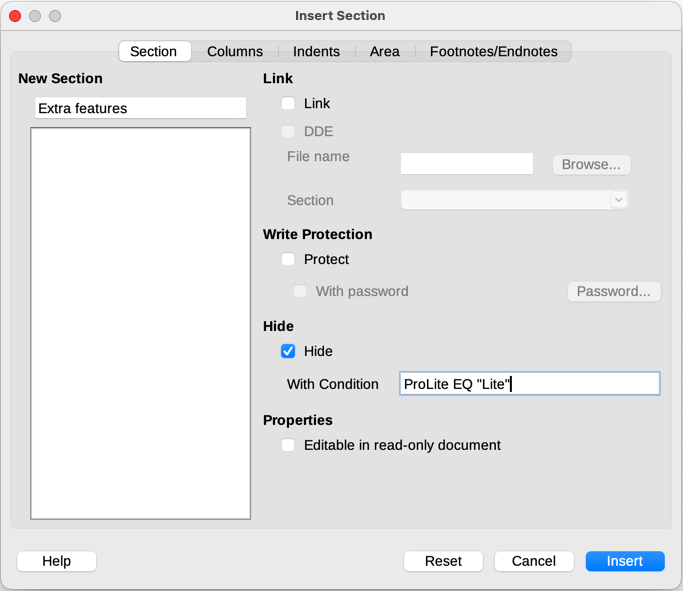
A conditional section is hidden if the condition is true. To create a conditional section:
1) Select the text that you want to be included in the conditional section. (You can edit this text later, just as you can edit any other text.)
2) Choose Insert > Section. On the Insert Section dialog (Figure 21), go to the Section tab, then select Hide and enter the condition in the With Condition box. You can also give the section a name; this is strongly recommended, so you can find it again easily if you have several sections in your document.
3) Click Insert to insert the section into your document.
To show a hidden section so you can edit it:
1) Choose Format > Sections.
2) On the Edit Sections dialog, select the section from the list.
3) Deselect Hide and click OK. You can now edit the contents of the section. Afterwards, you can choose Format > Sections and select Hide to hide the section again.
To make the hidden section a normal part of the document (that is, to remove the section markers, but not the contents of the section):
1) Show the hidden section, as described above.
2) On the Edit Sections dialog, select the section from the list.
3) Click Remove. The contents of the section are now a normal part of the document.
Figure 21: Creating a section to be hidden when a specified condition is met
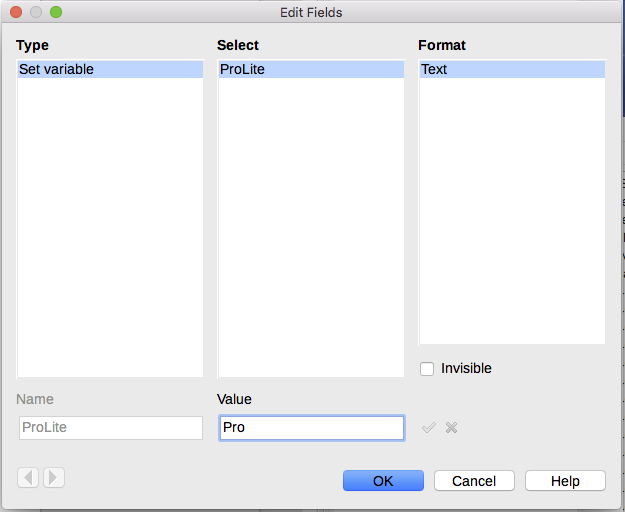
To change the value of the variable between Lite and Pro:
1) Find the variable field you created in “Choose or define a variable” above.
2) Click once just in front of this field, then right-click and click Fields in the context menu.
3) On the Edit Fields dialog (Figure 22), change the value of the variable to Pro.
4) If you have set fields to update automatically, all of the conditional and hidden text that uses this variable as a condition will change.
Note
Conditional text and hidden text can only be edited in the Edit Fields dialog.
Tip
To turn on automatic updating of fields, choose Tools > Options > LibreOffice Writer > General, and select Fields under Automatically Update.
Figure 22: Changing the value of the variable
A placeholder field prompts you to enter something (text, a table, a frame, an image, or an object).
To insert a placeholder field into a document:
1) On the Functions tab of the Fields dialog, select Placeholder in the Type column and select what the placeholder is for in the Format column.
2) In the Placeholder box, type the text that you want to appear in the placeholder field.
3) In the Reference box, type the text that you want to display as a help tip when you rest the mouse pointer over the field.
Figure 23 shows the results of inserting a placeholder field for an image.
Figure 23: Inserting a placeholder field
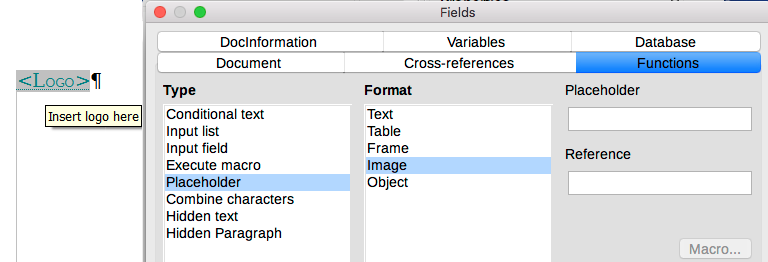
Because the <Logo> field is an Image placeholder, when you click the field in the document, the Insert Image dialog opens, prompting you to select an image. When you select an image and click Open, the image replaces the field in the document.
Similarly, clicking on a Table placeholder field opens the Insert Table dialog, clicking on a Frame placeholder field opens the Frame dialog, and clicking on an Object placeholder field opens the Insert OLE Object dialog. The Text placeholder field is different: you simply click it and type some text in the Placeholder box, which replaces the field.
Other uses of fields, including database fields, form fields, and content controls, are described in various chapters of this book.
LibreOffice provides many other fields that you may find useful, but they are too specialized to cover in this book. Please refer to the Help system for details, instructions, and examples.
Document classification and security are important for businesses and governments. Where sensitive information is exchanged between users and organizations, the parties agree how such information will be identified and handled. LibreOffice provides standardized means for sensitive information to be identified and protected, using a set of standard fields to hold sensitive information.
LibreOffice implemented the open standards produced by TSCP (Transglobal Secure Collaboration Participation, Inc.). It contains three BAF (Business Authentication Framework) categories: Intellectual Property, National Security and Export Control. Each category has four BAILS (Business Authorization Identification and Labeling Scheme) levels: Non-Business, General Business, Confidential, and Internal Only.
To enable document classification, open the TSCP bar (View > Toolbars > TSCP Classification). This toolbar contains list boxes to help in selecting the security of the document. LibreOffice then adds custom fields in the document properties (File > Properties, Custom Properties tab) to store the classification policy as document metadata.
To prevent a breach in security policy, contents with a higher classification level cannot be pasted into documents with a lower classification level.