Writer Guide 7.5
Chapter 21,
User Interface Variants
This document is Copyright © 2023 by the LibreOffice Documentation Team. Contributors are listed below. You may distribute it and/or modify it under the terms of either the GNU General Public License (https://www.gnu.org/licenses/gpl.html), version 3 or later, or the Creative Commons Attribution License (https://creativecommons.org/licenses/by/4.0/), version 4.0 or later.
All trademarks within this guide belong to their legitimate owners.
|
Jean Hollis Weber |
Kees Kriek |
|
|
Jean Hollis Weber |
|
|
Please direct any comments or suggestions about this document to the Documentation Team’s forum at https://community.documentfoundation.org/c/documentation/loguides/ (registration is required) or send an email to: loguides@community.documentfoundation.org. Emails sent to the forum are moderated.
Note
Everything you send to a forum, including your email address and any other personal information that is written in the message, is publicly archived and cannot be deleted.
Published February 2023. Based on LibreOffice 7.5.
Some keystrokes and menu items are different on macOS from those used in Windows and Linux. The table below gives some common substitutions for the instructions in this document. For a detailed list, see the application Help.
|
Windows or Linux |
macOS equivalent |
Effect |
|
Tools > Options |
LibreOffice > Preferences |
Access setup options |
|
Right-click |
Control+click or right-click depending on computer setup |
Open a context menu |
|
Ctrl (Control) |
⌘ (Command) |
Used with other keys |
|
Alt |
⌥ (Option) or Alt, depending on keyboard |
Used with other keys |
|
F11 |
⌘+T |
Open Styles deck in Sidebar |
By default, LibreOffice Writer’s commands are grouped in cascading menus and in toolbars filled with icons—the standard user interface described in Chapter 1. These menus and toolbars are described in the chapters that discuss the related tasks and functions.
In addition, Writer provides other user interface variants, displaying contextual groups of commands and contents. This chapter describes these user interface variants and provides a quick reference to the location of the tools and functions when using each of the variants.
When you set up Writer, you can choose one of these user interfaces, and you can switch between them and the standard interface at any time.
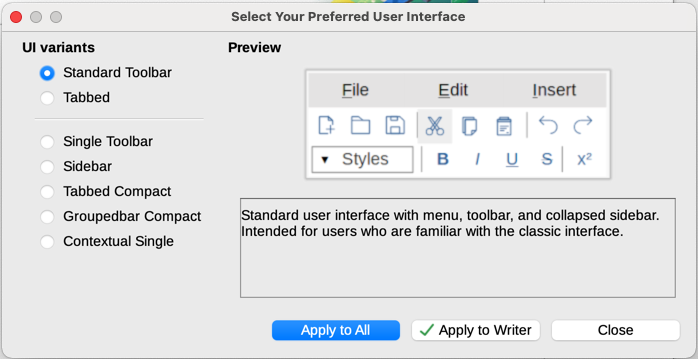
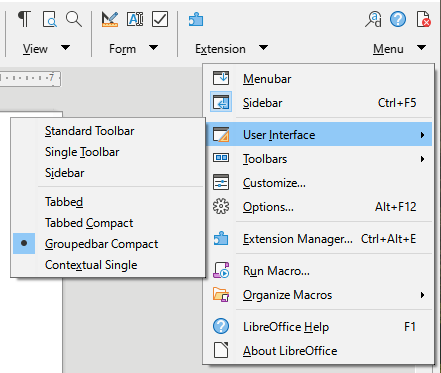
1) Choose View > User Interface on the Menu bar.
2) On the Select Your Preferred User Interface dialog (Figure 1), choose one of the variants on the left. An example of the variant is shown in the Preview box on the right, along with a short description.
3) Choose the relevant button to apply your selection to all components of LibreOffice, or only to Writer. The Writer window changes to match your selection.
4) Click Close to close the dialog.
Figure 1: Selecting a user interface
If you have activated experimental features (Tools > Options > Advanced), several more choices appear on the left-hand side. These choices are not described here.
Three of the user interface choices in Figure 1 are described in Chapter 1, Introducing Writer.
Standard Toolbar
Single Toolbar
Sidebar
The elements on each of the standard user interfaces can be modified using the View menu on the Menu bar.
The Tabbed interface (Figure 2) provides a familiar interface for users coming from proprietary office suites such as Microsoft Office. It includes a Menu bar, an Icon bar, a Tab bar, icons for the active tab, one or more tab-specific menus, and a Quick Menu. On Windows and Linux, the Menu bar can be hidden or displayed by clicking on the Menu Bar icon in the Icon bar (Figure 4).
1 Icon bar 2 Active tab 3 Icons on active tab 4 Tabs 5 Tab menus 6 Quick menu

Figure 2: Tabbed Interface with Menu bar hidden
In Writer, this user interface variant includes nine fixed tabs and five additional tabs. Each tab displays a set of icons grouped by context. The context can change depending on the location of the cursor or the item selected. Each tab also includes one or more tab-specific drop-down menus at the right-hand end. The Quick Menu is the same for all tabs.
The Tabbed interface can be customized using the Notebookbar tab of the Customize dialog to show and hide the individual icons on the various tabs. See Chapter 20, Customizing Writer, for more information.
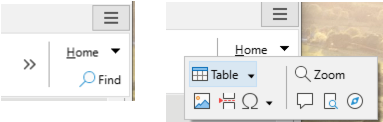
If the icons on a tab do not fit into the width of the Writer window, >> appears at the end of the row. Click it to display the other commands (Figure 3).
Figure 3: Displaying more commands on a tab
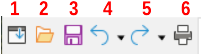
The icon bar (Figure 4) is located at the top left of the tabs.
Figure 4: Tabs – Icon box
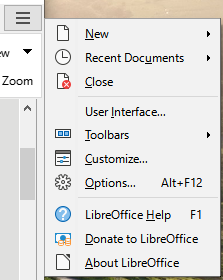
At the right-hand end of the tab bar is a Quick menu (Figure 5) containing some commonly used commands and links. Some of the Quick menu items have submenus, indicated by arrows on the right.
Figure 5: Quick menu
The fixed tabs in Writer are File, Home, Insert, Layout, References, Review, View, Extension, and Tools. The tabs are described on the following pages. The illustrations show the left and right ends of the tabs separately so they are large enough to more easily see the commands.
The File tab (Figure 6) includes commands to create new documents; open, save, print, and close documents; manage templates; export to PDF and EPUB; display document properties; add a digital signature; and sign an existing PDF.
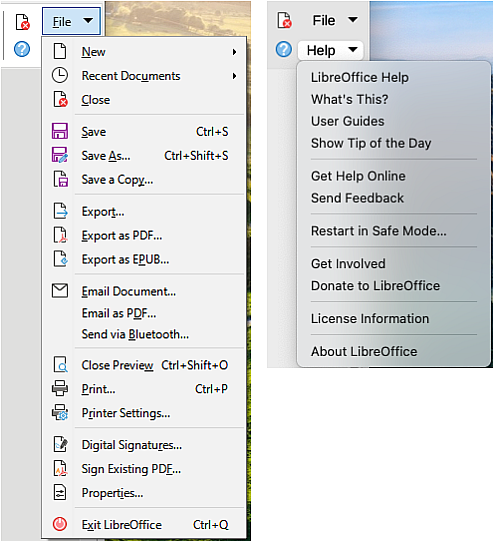
The File tab has two menus (Figure 7): File and Help. The File menu contains the same commands as the icons on the tab. The Help menu provides links to a variety of resources.
Figure 7: File tab menus
The Home tab (Figure 8) includes commands to cut, copy, paste, and format text; insert common items (image, table, special characters, and page break); apply, update, and edit styles; and others.
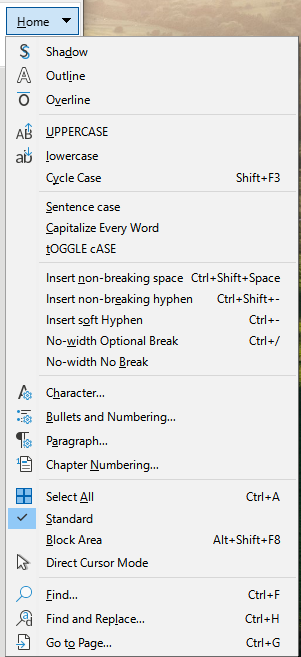
The Home menu (Figure 9) provides additional commands that are not on the tab.
Figure 9: Home tab menu
The Insert tab (Figure 10) includes commands to insert many commonly used items.
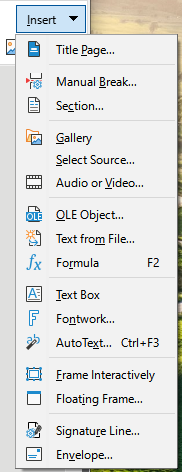
The Insert menu (Figure 11) provides some of the same commands.
Figure 11: Insert tab menu
The Layout tab (Figure 12) provides commands for working on page layout.
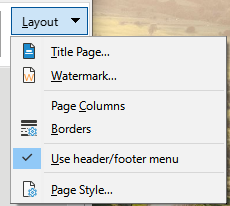
The Layout menu (Figure 13) provides commands for a few of the same items.
Figure 13: Layout tab menu
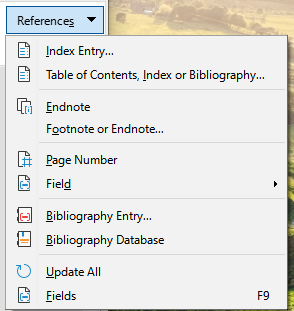
The References tab (Figure 14) provides commands for working with tables of contents, indexes, footnotes and endnotes, cross-references, bibliographies, and fields.
The References menu (Figure 15) provides many of the same commands.
Figure 15: References tab menu
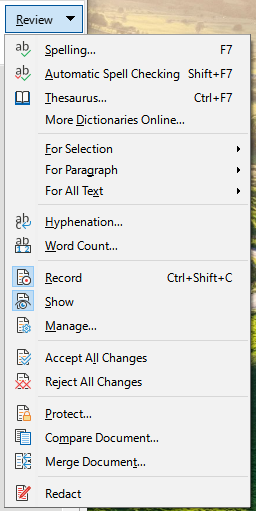
The Review tab (Figure 16) assists in editing. It provides quick access to recording, showing, hiding, and managing changes.
The Review menu (Figure 17) provides many of the same commands.
Figure 17: Review tab menu
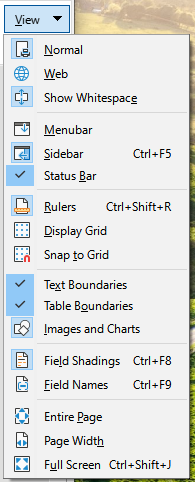
The View tab (Figure 18) provides commands related to the display of a document on screen.
The View menu (Figure 19) provides many of the same commands.
Figure 19: View tab menu
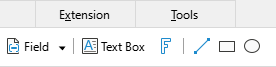
The Extension tab (Figure 20) contains only the menu for accessing the Extension Manager.
Figure 20: Tabbed Interface – Extension tab

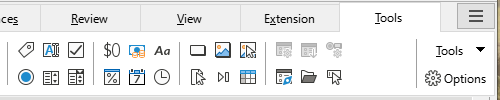
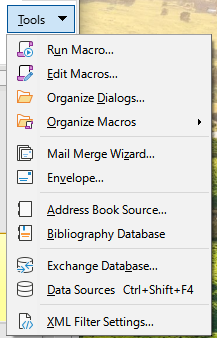
The Tools tab (Figure 21) provides several tools for macros, mail merge, and form creation.
The Tools menu (Figure 22) provides some of the same commands.
Figure 22: Tools tab menu
Additional tabs appear when an item is selected; they are displayed between the View and Extension tabs. The additional tabs in Writer are Draw, Image, Media, Object, and Table.
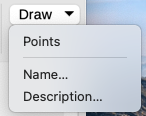
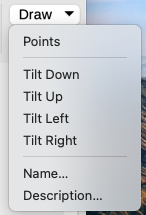
The Draw tab (Figure 23) is displayed when a drawing object is selected. It provides commands for captioning and modifying the drawing object and for inserting and modifying Fontwork objects.
The Draw menu (Figure 24) provides a subset of commands, which vary depending on the drawing object.
The Image tab (Figure 25) provides commands for working with images, including captions, cropping, borders and area styles and colors, anchors, wrapping, positioning, and filtering.
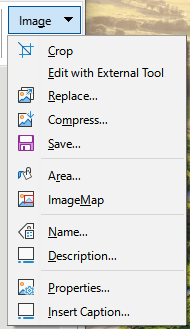
The Image menu (Figure 26) provides links to dialogs for working with images.
Figure 26: Image tab menu
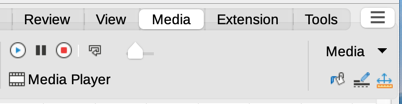
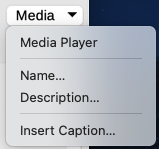
The Media tab (Figure 27) provides commands for positioning and running an audio or video file.
The Media menu (Figure 28) provides some of the same commands
Figure 28: Media tab menu
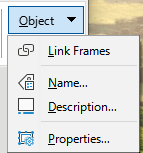
The Object tab (Figure 29) provides commands to position, resize, link, choose colors and borders for the selected object. The illustration shows the tab when a frame is selected.
The Object menu (Figure 30) provides a few of the same commands. The illustration shows the menu when a frame is selected.
Figure 30: Object tab menu
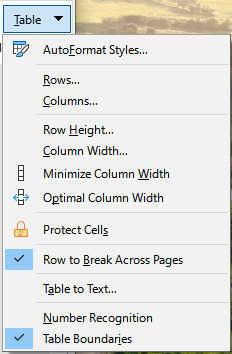
The Table tab (Figure 31) is opened when the cursor is in a table.
The Table menu (Figure 32) includes some commands not shown on the tab.
Figure 32: Table tab menu
The Tabbed Compact interface has the same tabs as the Tabbed interface, but the commands on each tab are arranged in a single row of icons, many with drop-down menus of choices.
Figure 33: Tabbed Compact interface example: Insert tab


The Groupedbar Compact interface (Figure 34) is divided into groups that contain commands organized as sets of icons and menus.
The Groupedbar menu (Figure 35) provides a subset of commands, including a convenient way to change the user interface.
Figure 35: Groupedbar menu
The Contextual Single interface displays a standard Menu bar and a single toolbar with context-dependent content.