
Writer Guide 7.6
Chapter 5,
Formatting Pages: Basics
Page styles and related features
This document is Copyright © 2022 by the LibreOffice Documentation Team. Contributors are listed below. You may distribute it and/or modify it under the terms of either the GNU General Public License (https://www.gnu.org/licenses/gpl.html), version 3 or later, or the Creative Commons Attribution License (https://creativecommons.org/licenses/by/4.0/), version 4.0 or later.
All trademarks within this guide belong to their legitimate owners.
|
Jean Hollis Weber |
|
|
|
Jean Hollis Weber |
Kees Kriek |
Gillian Polack |
|
Bruce Byfield |
John A Smith |
Ron Faile Jr. |
|
Randolph Gamo |
Kees Kriek |
Jenna Sargent |
|
Jamie Eby |
|
|
Please direct any comments or suggestions about this document to the Documentation Team’s forum at https://community.documentfoundation.org/c/documentation/loguides/ (registration is required) or send an email to: loguides@community.documentfoundation.org. Emails sent to the forum are moderated.
Note
Everything you send to a forum, including your email address and any other personal information that is written in the message, is publicly archived and cannot be deleted.
Published August 2023. Based on LibreOffice 7.6 Community.
Other versions of LibreOffice may differ in appearance and functionality.
Some keystrokes and menu items are different on macOS from those used in Windows and Linux. The table below gives some common substitutions for the instructions in this document. For a detailed list, see the application Help.
|
Windows or Linux |
macOS equivalent |
Effect |
|
Tools > Options |
LibreOffice > Preferences |
Access setup options |
|
Right-click |
Control+click or right-click depending on computer setup |
Open a context menu |
|
Ctrl (Control) |
⌘ (Command) |
Used with other keys |
|
Alt |
⌥ (Option) or Alt, depending on keyboard |
Used with other keys |
|
F11 |
⌘+T |
Open Styles deck in Sidebar |
Writer provides several ways to control page layouts. This chapter describes the use of page styles and some associated functions:
Margins
Page breaks
Headers and footers
Page numbering
Title pages
Footnotes and endnotes
Chapter 6, Formatting Pages: Advanced covers the use of columns, frames, tables, and sections; changing page orientation within a document; and the use of borders and backgrounds. Some other uses of page styles are discussed in Chapter 8, Introduction to Styles. The Page Style dialog is covered in detail in Chapter 9, Working with Styles.
Note
All pages in a Writer document are based on page styles. The other layout methods (described in Chapter 6) build upon the underlying page style.
Tip
Page layout is usually easier if you select the options to show text, object, table, and section boundaries in Tools > Options > LibreOffice > Application Colors and the options for paragraph ends, tabs, breaks, and other items in Tools > Options > LibreOffice Writer > Formatting Aids.
In Writer, page styles define the basic layout of all pages, including page size, margins, the placement of headers and footers, borders and backgrounds, number of columns, page numbers, and so on.
Writer comes with several page styles, which you can build on or modify, and you can define new (custom) page styles. A single document can use one or many page styles. If you do not specify a page style, Writer uses the Default Page Style.
To change the layout of individual pages, either define a new page style or use one of the techniques (sections, frames, or tables) described in Chapter 6, Formatting Pages: Advanced.
Note
For some documents, all layout changes (such as the position of page numbers and other elements in a header or footer on facing pages) can be defined in a single page style.
Tip
Any modifications of page styles, including the Default Page Style, apply only to the document you are working on. If you want the changes to be the default for all documents, you need to put the changes into a template and make that template the default template. See Chapter 10, Working with Templates, for details.
You can change page margins in these ways:
Using the page rulers—quick and easy, but does not have fine control.
Using the Page Style dialog—can specify margins to two decimal places.
Using the Page deck in the Sidebar—changes all margins to the same value.
Note
If you change the margins using any of these methods, the new margins are recorded in the page style and affect all pages that use that style. The new margins will be shown in the Page Style dialog the next time you open it.
To change the margins on some pages, but not others, you must use different page styles and switch between them; see “Inserting page breaks” below.
To change margins using the rulers:
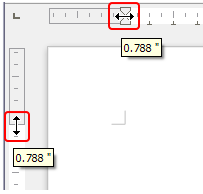
1) The shaded sections of the rulers are the margins (Figure 1). Put the mouse pointer over the line between the gray and white sections. The pointer turns into a double-headed arrow (or some other symbol, depending on your operating system) and displays the current setting in a tooltip.
2) Hold down the left mouse button and drag the mouse to move the margin.
Figure 1: Moving the margins
Note
The small arrows on the ruler are used for indenting paragraphs. They are often in the same place as the page margins, so be careful to move the margin marker, not the arrows. The double-headed arrows shown in Figure 1 are the mouse pointers placed in the correct position.
Tip
After making a change, pass the mouse pointer over the new margin to show its new measurement.
To change margins using the Page Style dialog:
1) Right-click anywhere on the page and select Page Style in the context menu.
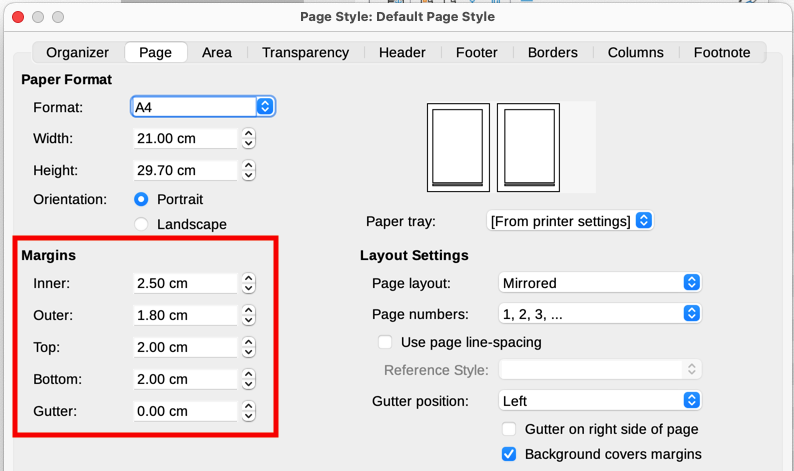
2) On the Page tab of the dialog (Figure 2), type the required distances in the Margins boxes. The Gutter margin is the extra space to leave between the left (or inner) edge of the page and the left (or inner) margin. Alternatively, leave the Gutter set to zero and add the gutter margin amount to the left or inner margin value.
3) Click OK to save.
Figure 2: Page tab of Page Style dialog
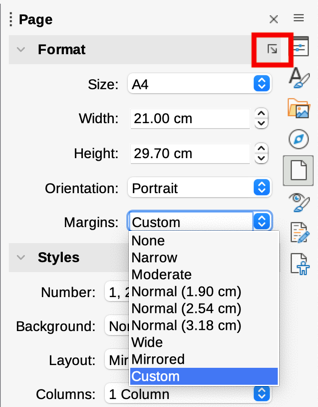
To change margins using the Page deck in the Sidebar, choose one of the preset margins in the drop-down list (Figure 3) or open the Page Style dialog from the More Options icon at the top right of the Format section’s title bar.
Figure 3: Changing margins using the Sidebar
Note
Changing the margin on the Sidebar changes all four margins to the same dimension. Use another method if you want margins of different sizes.
In many documents (for example, a multi-page report), you want the text to flow from one page to the next as you add or delete information. Writer does this automatically, unless you override the text flow using one of the techniques described in this section.
You can control some of the automatic text flow in several ways, including:
Use the Keep with next paragraph option, for example to prevent the lead-in sentence to a list from being separated from the list. This option is found on the Text Flow tab of the Paragraph dialog (right-click and choose Paragraph > Paragraph in the context menu to open the dialog).
Figure 4: Keep with next paragraph and Do not split paragraph options on Paragraph dialog
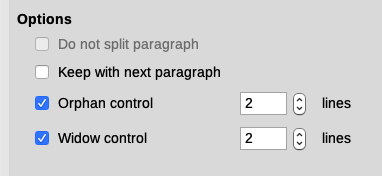
Use the Do not split paragraph option on the Text Flow tab of the Paragraph dialog (for individual paragraphs) or the Paragraph Style dialog (for all paragraphs with that style).
Use a paragraph style to require a paragraph to start on a new page. A typical use is for chapter titles to always start on a new right-hand (odd-numbered) page; use the Paragraph Style dialog to define this. See Chapter 9, Working with Styles, for more information.
To have a page break in a particular place—for example, to put a heading at the top of a new page—you can position the cursor at the point where you want to start the new page and select Insert > Page Break on the Menu bar.
To have the new page use a different page style—for example, to change from a First Page style to a Left Page style—use either of these methods.
Caution
Do not try to change a page style for a single page without inserting a page break. The page style of some or all of the other pages—before and after the changed page—may also change. For more information, see Chapter 8, Introduction to Styles.
Method 1
1) Position the cursor at the point you want to start the next page. Select Insert > More Breaks > Manual Break.
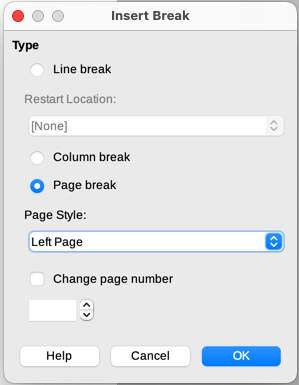
2) In the Type section of the Insert Break dialog (Figure 5), Page break is preselected, and Style is set at [None]. In the Style drop-down list, select the page style for the next page. Do not select the Change page number option. Click OK.
Figure 5: Inserting a manual page break and changing the page style
Method 2
1) Position the cursor in the paragraph you want to be at the start of the next page. Right-click and choose Paragraph > Paragraph in the context menu.
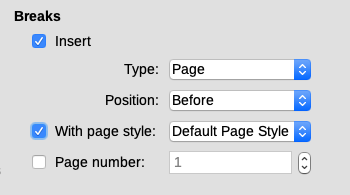
2) On the Text Flow page of the Paragraph dialog (Figure 6), in the Breaks section, select Insert and With page style. In the Style drop-down list, select the page style for the next page. Do not select the Page number option. Click OK to insert the page break.
Figure 6: Inserting a manual page break using the Paragraph dialog
Tip
See “Numbering the first page something other than 1“ below for information on the use of the page number field in these dialogs.
Headers are portions of a document that appear at the top of every page; footers appear at the bottom of a page. They typically include a page number and sometimes document information such as the title.
In Writer, headers and footers are specified in page styles. Therefore, all the pages with the same page style will display the same header and footer, although the contents of the header/footer may vary. For example, the header/footer on the first page of a section, chapter, or document may contain different information than the rest of the headers and footers in the document, even though the page style is the same. See “Using one page style” below.
Terminology
A heading is a paragraph that introduces a chapter or section of a document; for example, “Creating headers and footers” above. A header (also known as a running header) appears in the top margin of each page and typically displays information about the document; it is similar to a footer at the bottom of pages.
To insert a header, do one of the following:
Click above the top of the text area. When the Header marker appears, click the +. To insert a footer, click below the bottom of the text area to display the Footer marker, and then click the +.
Figure 7: Header marker at top of text area

Select Insert > Header and Footer > Header > [Page Style] on the Menu bar. The submenu lists the page styles used in the document and the entry All, which activates headers on all the page styles of the document. Similarly, to insert a footer, choose Insert > Header and Footer > Footer > [Page Style].
Figure 8: A page with a page header

Right-click anywhere on the page and select Page Style in the context menu. On the Page Style dialog go to the Header tab and select Header on, or go to the Footer tab and select Footer on. This method affects only the one page style.
In Writer, headers and footers are paragraphs; therefore, you can format the header or footer text using the same techniques as for formatting text in the main body of the document. See Chapter 4, Formatting Text.
You can also add images to headers and footers using any of the techniques described in Chapter 11, Images and Graphics, and you can line up information using tables as described in Chapter 6, Formatting Pages: Advanced.
Tip
Writer provides paragraph styles for headers and footers, which you can modify and use in the same way as other paragraph styles. See Chapter 8, Introduction to Styles, and Chapter 9, Working with Styles.
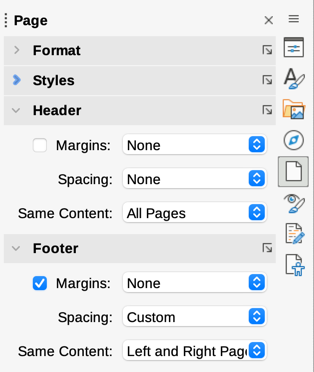
Some formatting can be applied using the Page tab on the Sidebar: margins, spacing, and whether same content goes on the first page and/or left and right pages (Figure 9).
Figure 9: Formatting a header or footer using the Sidebar
For more options, use the Page Style dialog.
1) Use any of these methods to open the Page Style dialog:
Click anywhere on the page and choose Format > Page Style on the Menu bar.
Right-click anywhere on the page and choose Page Style in the context menu.
If the page has a header, click in the header area. When the Header marker appears, click the down arrow and select Format Header.
If the page has a footer, click in the footer area. When the Footer marker appears, click the down arrow and select Format Footer.
On the Page tab of the Sidebar, click the More Options icon on the right of the Header or Footer title bar.
2) On the Header or Footer tab of the Page Style dialog (Figure 10), change the margins, spacing, and height.
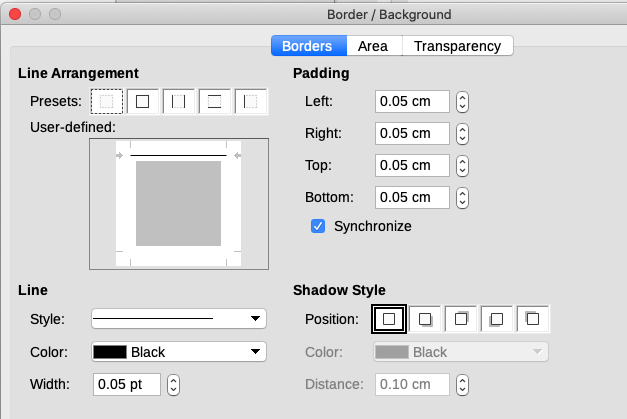
3) Click More to open the Border/Background dialog (Figure 11), where you can add borders, background colors, and background images to the header or footer.
Figure 10: Footer tab of Page Style dialog
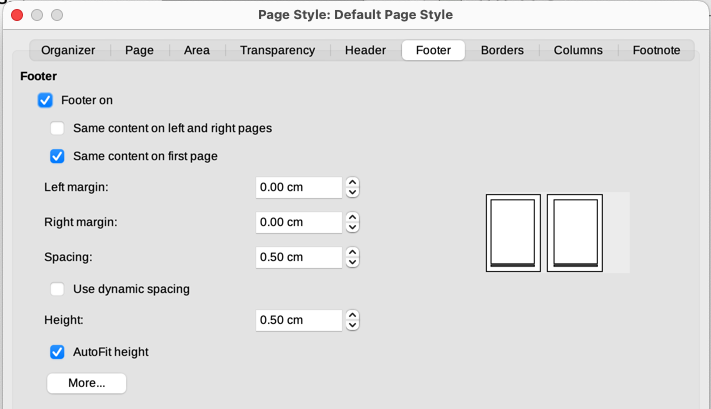
Figure 11: Border / Background tab for header or footer
When you place a page number field in a header or footer, the number appears on every page with that page style and changes automatically from one page to the next. The page number appears with a gray background. This gray background denotes a field; although the background is visible on screen, it is not printed.
Tip
To turn off the gray background, choose View > Field Shadings (or press Ctrl+F8). If you see the words “Page number” instead of a number, press Ctrl+F9. This toggles Writer between displaying the field name and the contents of the field.
This topic describes some techniques to insert page numbers and related information in headers or footers of a document:
Error: Reference source not found
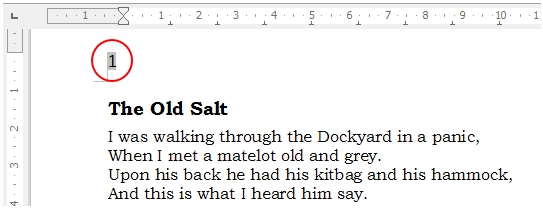
The simplest case is to have the page number at the top or bottom of every page and nothing more (Figure 12). To do this, choose Insert > Page Number (to open the Page Number Wizard) or place the cursor in the header or footer and chooce Insert > Field > Page Number (to insert the page number directly and optionally adjust settings later).
Figure 12: Page number inserted in the header
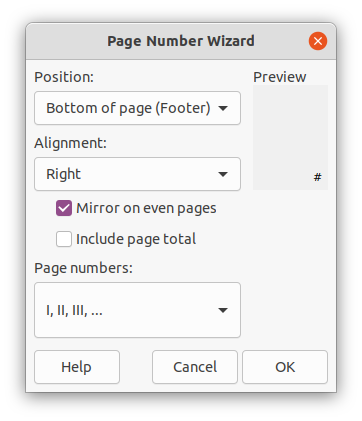
Choose Insert > Page Number from the Menu bar to open the Page Number Wizard (Figure 13), where you can choose the location (header or footer). the alignment (right, center, left), the numbering style (i,ii,iii or 1,2,3 or other variations), and other settings for the page numbers.
If you do not use the Page Number Wizard, or to change any of the settings, follow the instructions in “Page number alignment” and “Page number format” below.
For additional page number settings. see “Restarting page numbering and changing numbering format” below, “Numbering the first page something other than 1” below, and “Numbering pages by chapter” below.
Figure 13: Page Number Wizard
To align the page number to the left, right, or center, click in the header or footer and then use one of these methods to modify the footer paragraph:
Click on one of the alignment icons on the Formatting toolbar.
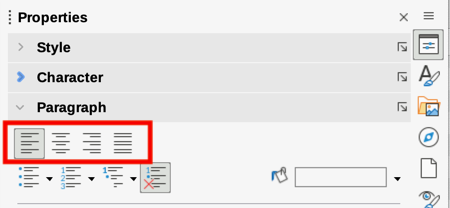
Open the Properties deck in the Sidebar. In the Paragraph section, click on one of the alignment icons (Figure 14).
Figure 14: Alignment icons in Properties deck of Sidebar
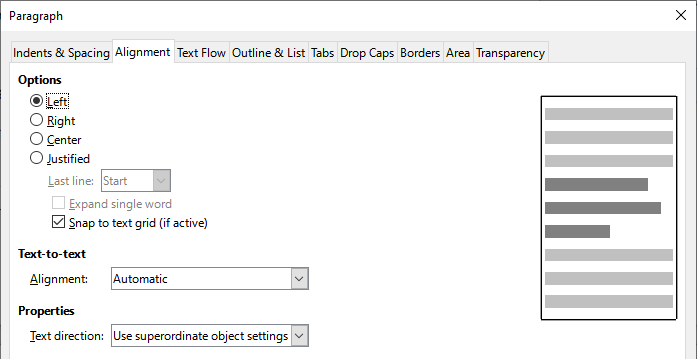
Right-click and choose Paragraph > Paragraph in the context menu. On the Paragraph dialog, go to the Alignment tab and choose an alignment option, then click OK.
Figure 15: Alignment tab of the Paragraph dialog
You can set the page number to display in several types of numerals: Arabic (1, 2, 3), lower-case Roman (I, ii, iii), ordinal (1st, 2nd, 3rd) and others. To do that, either double-click the page number and select the desired format on the Edit Fields dialog or specify the format of numbers in the page style as explained here.
1) Right-click in the text area of the page and select Page Style in the context menu.
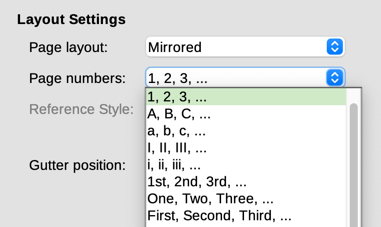
2) On the Page tab of the Page Style dialog, in the Layout Settings section on the right, select i, ii, iii, …. in the Page numbers: drop-down list to use lowercase Roman numerals (Figure 16).
Figure 16: Changing the format of page numbers
Caution
Any change in the number format affects the page numbers on all pages using that page style, regardless of the method used to change the format. To change the format of page numbers on some pages but not all, you need to use different page styles; see “Restarting page numbering and changing numbering format” below.
Many documents, such as books, have the front matter (such as the table of contents) numbered with Roman numerals and the main body of the document numbered in Arabic numerals, restarting at 1. To restart the page numbering at 1, follow these instructions.
First, define the numbering format for two page styles: Front Matter and Default Page Style. See “Using different page styles” below and “Page number format’ above.
Next, in the front matter of the document, insert a page number (see “Simple page numbering” above).
Then, restart page numbering:
1) Place the cursor in the first paragraph of the page to have the Default Page Style. (A heading is a paragraph.)
2) Choose Format > Paragraph on the Menu bar, or right-click and choose Paragraph > Paragraph, to display the Paragraph dialog.
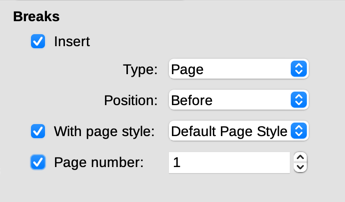
3) On the Text Flow tab of the Paragraph dialog, in the Breaks area (Figure 17):
a) Select Insert.
b) In the Type drop-down list, select Page.
c) In the Position drop-down list, select Before.
d) Select With page style and choose from the drop-down list the page style for the next page.
e) Select Page number to make the field active. Type 1. Click OK.
Figure 17: The Breaks section of the Text Flow tab of the Paragraph Style dialog
The instructions for starting a document with a page number greater than 1 are similar to Step 3 in the previous section.
1) Insert a page number in the header or footer (Insert > Page Number).
2) Click in the first paragraph in the text area. Choose Format > Paragraph (or right-click and choose Paragraph > Paragraph in the context menu).
3) In the Text Flow page of the Paragraph dialog, in the Breaks section (Figure 17), select Insert and select Page in the Type drop-down list. Select With page style and the page style used for the first page of the document.
4) Select Page number to make the field active. Type the starting page number required. Click OK.
Note
If the starting page number selected is an even number, a blank page will occur before the first page. LibreOffice adheres to the convention that odd page numbers go on right-hand pages and even page numbers on left-hand pages.
This blank page can be suppresed when the file is printed or exported as a PDF. See Chapter 7, Printing and Publishing, for more information.
Technical documents often include the chapter number with the page number in the header or footer. For example, 1-1, 1-2, 1-3, ...; 2-1, 2-2, 2-3, ... To set up this type of page numbering in Writer, do these things:
1) Ensure that chapter titles are all identified by the same paragraph style, for example, the Heading 1 style.
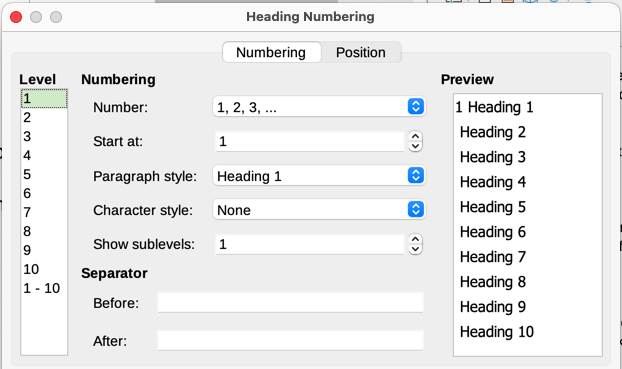
2) Use Tools > Heading Numbering to tell Writer what paragraph style is used for Level 1, and specify “1,2,3” in the Number box (Figure 18).
Figure 18: Specifying paragraph style and numbering for chapter titles
3) Insert the chapter number in the document:
a) Place the cursor in the header or footer just before the page number inserted earlier, and choose Insert > Field > More Fields on the Menu bar.
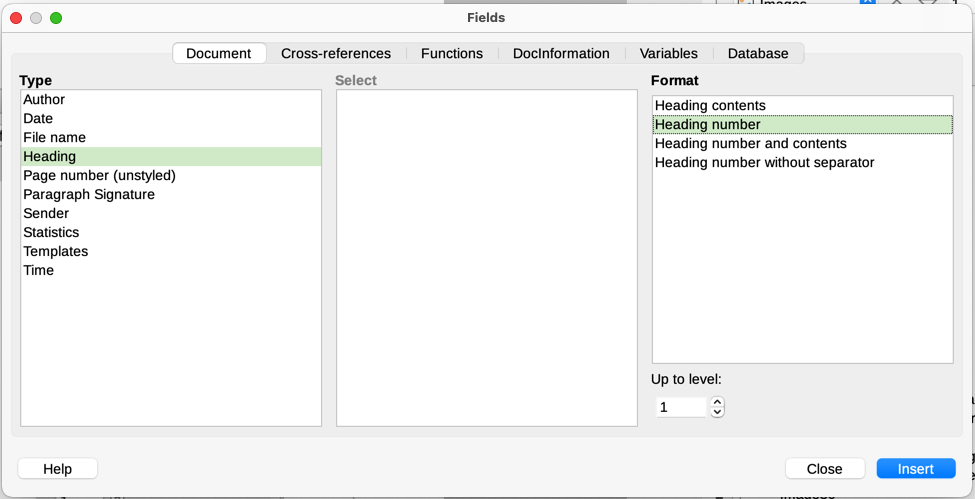
b) On the Fields dialog (Figure 19), go to the Document tab. Select Heading in the Type list, Heading number in the Format list, and 1 in the Level box. Click Insert.
c) Type a hyphen or other punctuation between the chapter number and the page number.
Figure 19: Inserting a heading number field
In addition to page numbers, other information often is placed into headers and footers. For exampe:
Type the word Page (and a space) before the Page Number field so the header reads Page 1, Page 2, and so on.
Use the Page Count field (Insert > Field > Page Count) and the Page Number field, so a header reads Page 1 of 4., Page 2 of 4, and so on.
Document titles and chapter titles can be typed in or (better) added as fields. That way, if something changes, the headers and footers are all updated automatically.
Fields are covered in Chapter 17, but one example may be useful here. To insert the document title into the header on a Default page style:
1) Select File > Properties > Description on the Menu bar, enter a title for the document in the Title area, and click OK to close the dialog.
2) Add a header as described above.
3) Place the cursor in the header part of the page.
4) Select Insert > Field > Title on the Menu bar. The title should appear on a gray background (which does not show when printed and can be turned off).
5) To change the title of the document, select File > Properties > Description again and edit.
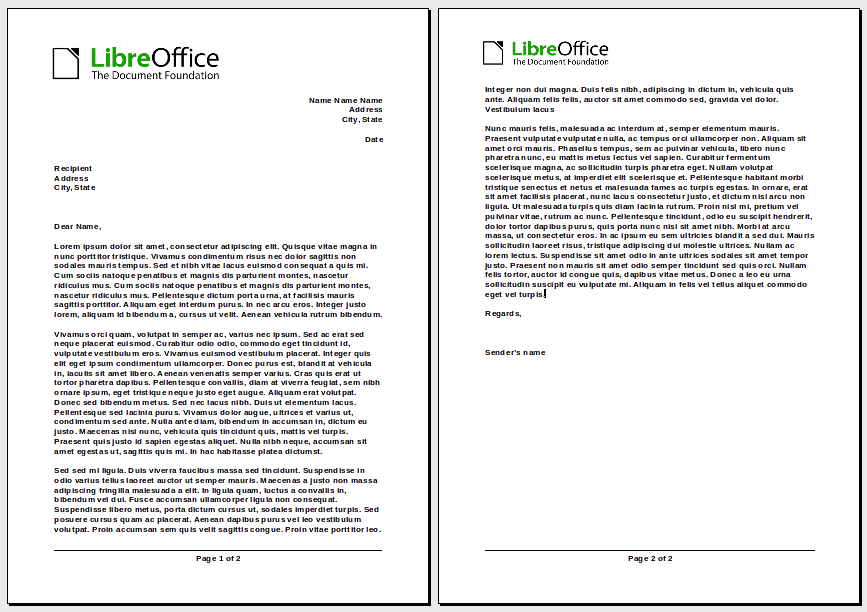
Many documents, such as letters and memos, have a first page that is different from the other pages in the document. For example, the first page of a letterhead typically has a different header, as shown in Figure 20, or the first page of a report might have no header or footer, while the other pages do.
Figure 20: Letterhead with different headers for first and following pages
You can do this in several ways:
Use the Default (or any other) page style for the document. Deselect the Same content on first page option on the header/footer tabs in the Page Style dialog, and then add different headers/footers to the first page and to the other pages of the document. See “Using one page style” below.
Use different page styles for the first page and for the following pages. Set the Next Page attribute for the first page so the next page automatically becomes the style for following pages. See “Using different page styles” below.
Add a title page at the beginning of the document. See “Adding title pages” below.
This example uses the Default Page Style.
1) Right-click anywhere on the page and choose Page Style in the context menu. On the relevant tab (Header or Footer) of the Page Style dialog, select Header/Footer on and deselect Same content on first page (Figure 21). Optionally select Same content on left and right pages.
2) Insert a header or footer on any page using the Default Page Style. See “Creating headers and footers” above.
3) Add different header and footer content to the first page and to the other pages of the document. For example, leave the header/footer blank on the first page.
Figure 21: Setting up footers to have different content on different pages

As an example, we can use the First Page and Default page styles that come with LibreOffice. Figure 22 shows what we want to happen: the first page is to be followed by the default page, and all the following pages are to be in the default page style.
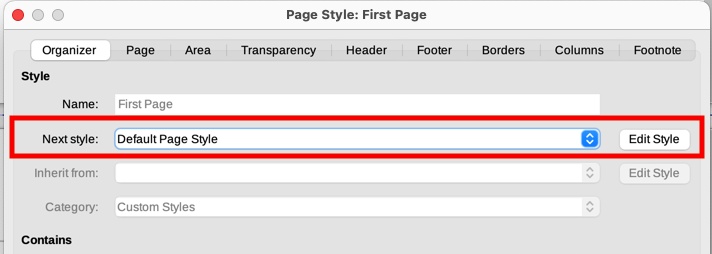
To do this, open the Page Style dialog for the First Page style, go to the Organizer tab, and choose Default Page Style in the Next Style list (Figure 23).
Figure 22: Flow of page styles
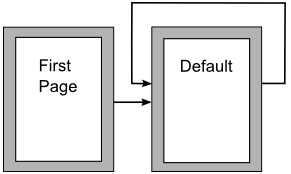
Figure 23: Setting the next style for a page style
Writer provides a fast and convenient way to add one or more title pages to a document and optionally to restart the page number at 1 for the body of the document.
Choose Format > Title Page on the Menu bar to display the Title Page dialog (Figure 24).
Figure 24: Adding title pages to a document
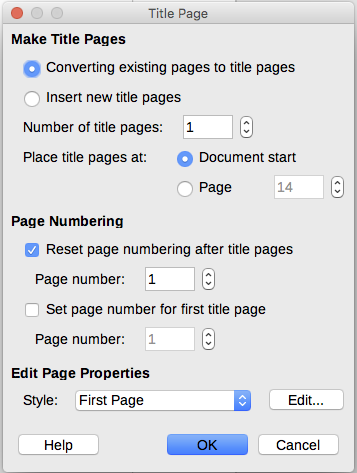
On the Title Page dialog, you can make the following choices:
Convert existing pages to title pages, or insert new title pages.
How many pages to convert or insert.
Where those pages are located.
If and where to restart page numbering, and what number to start with.
What page style to use for the title page.
Using this technique, you can insert several “title pages” at different points in a document, for example to add decorative pages between chapters as well as title, copyright, and other pages at the beginning of a book.
Footnotes appear at the bottom of the page on which they are referenced. Endnotes are collected at the end of a document.
To work effectively with footnotes and endnotes if the defaults do not meet your needs:
Insert footnotes and define their format (see Chapter 3, Working with Text: Advanced).
Define the location of footnotes on the page, and the color and line styles for separator lines.
The location of footnotes on the page, and the color and style of the line that separates the footnotes from the text, are defined in the page style. If you are using several page styles, and may have footnotes on any of them, be sure to define the footnote location and separator line on each of the page styles.
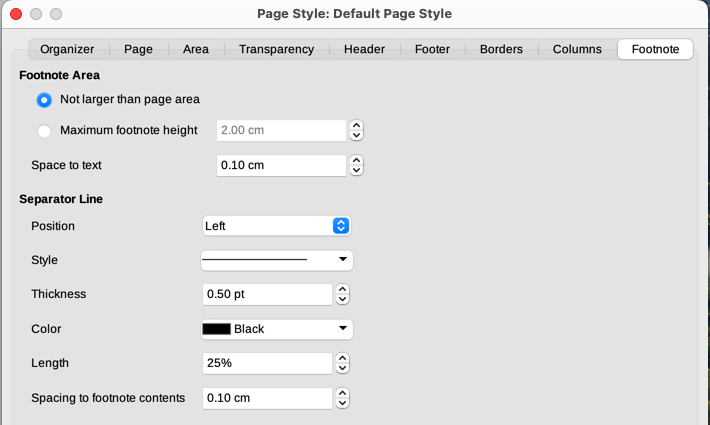
Choose Format > Page Style on the Menu bar or right-click a page and choose Page Style in the context menu, to display the Page Style dialog. Go to the Footnote tab (Figure 25) and make selections, then click OK to save the changes.
Keeping the default setting Not larger than page area, the footnotes area is calculated automatically on the basis of the number of footnotes. To manually control the maximum space that footnotes can take, select the Maximum footnote height option and enter the value in the preferred unit of measurement.
A footnote higher than the maximum height will spill over on to the next page. Use the second section of the page to customize the separator between the footnotes and the main text area.
Figure 25: Defining footnote location and separator line
In addition to manual page breaks (discussed above), you may sometimes wish to use column breaks and line breaks. The methods for inserting these breaks are similar to the methods for manual page breaks.
Manual column breaks are available only in a multi-column document or section. To insert a manual column break:
1) Position the cursor at the point you want to start the new column. Select Insert > More Breaks > Manual Break on the Menu bar.
2) In the Type section of the Insert Break dialog (Figure 5), select Column break. Click OK.
You can also use the Breaks section in the Paragraph dialog (Figure 6).
You can use line breaks to manually format text in several ways:
Continue on the next line (the default).
Continue on the next full line, below all anchored objects that intersect with the current line.
Continue on the next line that is unblocked on the left-hand side.
Continue on the next line that is unblocked on the right-hand side.
To insert a default line break, press Shift+Enter.
To insert other line break types:
1) Position the cursor at the point you want to break the text to a new line. Select Insert > More Breaks > Manual Break on the Menu bar.
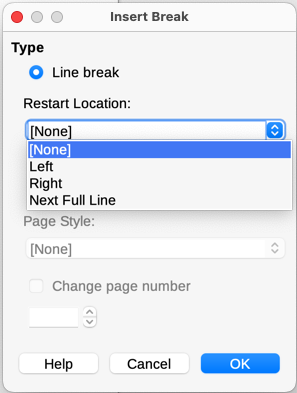
2) In the Type section of the Insert Break dialog (Figure 26), select Line break.
3) Select the type of line break required. Click OK.
Figure 26: Inserting a line break
A document can contain pages in more than one orientation. A common scenario is to have a landscape page in the middle or end of a document, where the other pages are in portrait orientation. Here are the steps to achieve it.
1) To keep the margins the same as on other pages, then note the margin settings of the current page style (found on the Page tab of the Page Style dialog).
2) On the Styles deck of the Sidebar, right-click Landscape in the list of page styles and choose Edit Style.
3) On the Organizer tab of the Page Style dialog (Figure 27), make sure Next Style is set to Landscape (to allow for having more than one sequential landscape page).
Figure 27: Set the next page style to Landscape

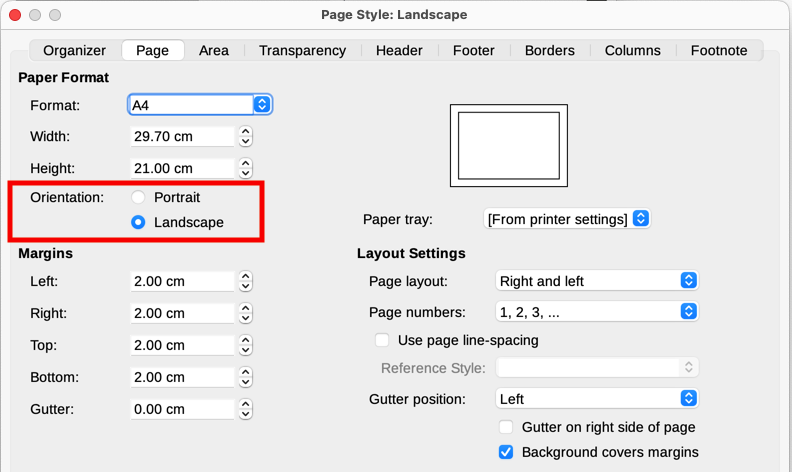
4) On the Page tab of the Page Style dialog (Figure 28), make sure Orientation is set to Landscape. Change the margins so that they correspond with the margins of the portrait page. That is, the portrait top margin becomes the landscape left margin, and so on.
5) Click OK to save the changes.
Figure 28: Set orientation and margins for a landscape page
After the Landscape page style is defined, here is how to apply it:
1) Position the cursor in the paragraph or table at the start of the page that is to be set to landscape. Right-click and choose Paragraph > Paragraph or Table Properties, respectively, in the context menu.
2) On the Text Flow page of the Paragraph dialog (Figure 29) or the Table Properties dialog (Figure 30), select Insert (or Break for a table) and With Page Style. Set the Page Style property to Landscape. Click OK to apply the new page style.
3) Position the cursor in the paragraph or table where the page is to return to portrait orientation and change the paragraph properties or table properties so that With Page Style is the portrait page style that was used before the Landscape page style. Click OK to return to the portrait page style.
Figure 29: Specifying a page break before a paragraph
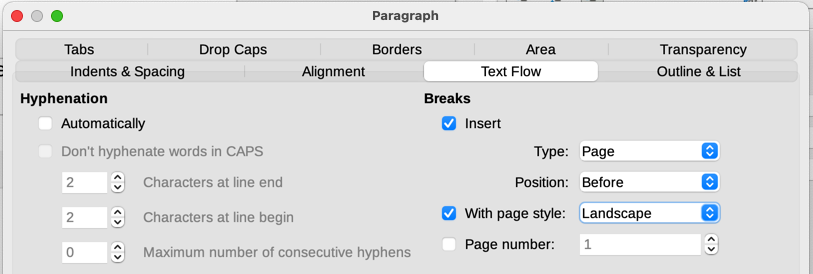
Figure 30: Specifying a page break before a table

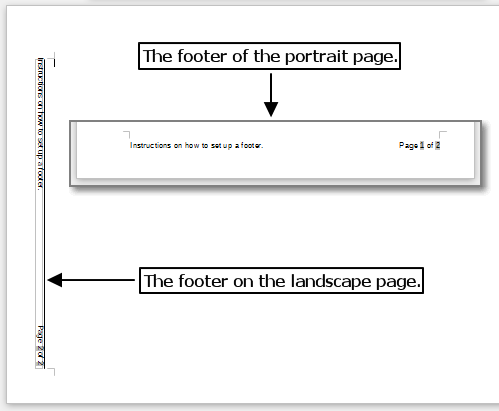
When a header or footer is defined on a landscape page, it is positioned on the long side of the page. If landscape pages are inserted between portrait pages, you might want the headers and footers to be on the short sides of the landscape pages, so that turning the landscape pages 90 degrees (as in a printed book) presents the same layout as on the portrait pages.
You can set up portrait-oriented headers and footers on landscape pages by using frames. These are a bit tricky to set up, but once you have done so, they are part of the Landscape page style and appear on all landscape pages in the document.
In the example below, we want to insert a landscape page into a document so that it has the same header, footer, and margins as the portrait pages. In the example, the default page style is portrait, A4 size, with header and footer of 0.5 cm with 0.5 cm spacing.
To match the layout of the landscape page to that of the portrait pages:
The landscape page should have the header enabled, but not the footer.
The top margin of the landscape page will be one centimeter less than the left margin of the portrait page, since it will have an (empty) header where we will anchor both the vertical header and footer frames.
The bottom margin of the landscape page will be equal to the right margin of the portrait page.
The left and right margins of the landscape page must be one centimeter larger than the corresponding top and bottom of the portrait page so that the longitudinal size of both pages matches. That centimeter is the result of adding the size of the header or footer and the spacing to the main text (0.5 for the header or footer and 0.5 cm for the spacing).
To achieve these results, follow these steps:
1) Modify the margins of the Landscape page style so the size of the text space is the same on both page styles.
|
Portrait (vertical) page |
Landscape (horizontal) page |
||
|
Top margin |
1.5 cm |
Top margin |
1.8 cm |
|
Bottom margin |
1.5 cm |
Bottom margin |
1.8 cm |
|
Left (inner) margin |
2.8 cm |
Left (inner) margin |
2.5 cm |
|
Right (outer) margin |
1.8 cm |
Right (outer) margin |
2.5 cm |
2) Insert a manual page break where you want a landscape page to appear (Insert > More Breaks > Manual Break) and choose Landscape for the page style.
3) Copy and paste all the content from the footer of the portrait page and paste it into a blank paragraph on the landscape page. Be sure this text has the Footer paragraph style so the font settings will match.
Figure 31: Copy the footer, paste, and select it

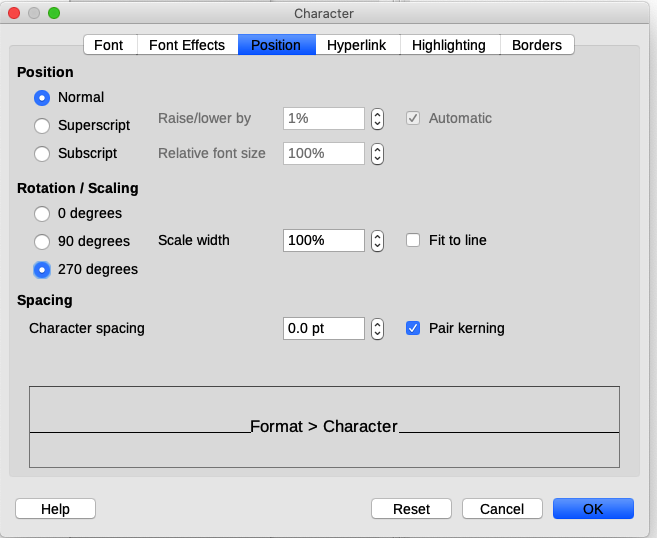
4) Select the full text (including the fields) you just pasted. Choose Format > Character. In the Character dialog, choose the Position tab and set Rotation / Scaling to 270 degrees (counterclockwise). Click OK.
Figure 32: Rotating the footer text 270 degrees
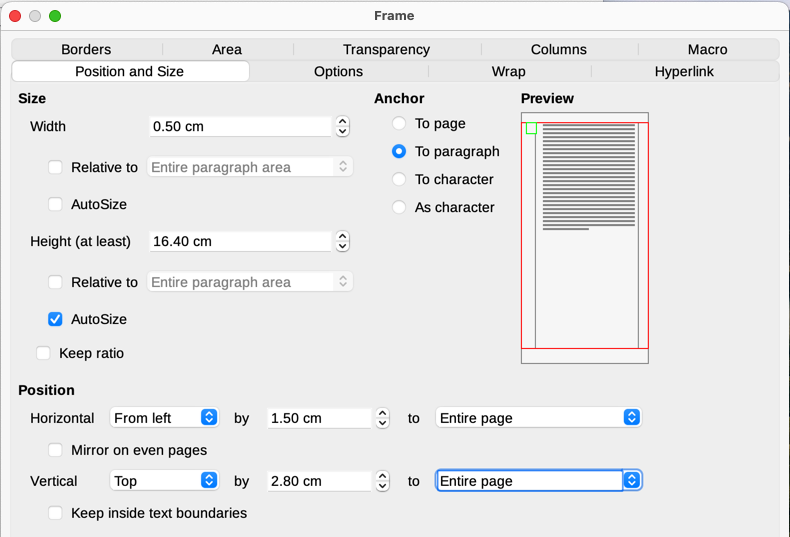
5) With the text still selected, choose Insert > Frame > Frame. In the Frame dialog (Figure 33), select the Type tab and enter the width, height, and horizontal and vertical position for the footer. Deselect the automatic sizing options in Width and Height.
Figure 33: Defining the size and position of the footer frame
6) Select the entire frame and modify the width and height:
The width should be 0.5 cm (height of the vertical page style footer).
The height must be equal to the Din A4 page width (21 cm) minus the sum of the top and bottom margins of 2.8 cm and 1.8 cm, which results in 16.4 cm.
7) Cut the frame (Ctrl+X), move to the header of the landscape page and paste it into the header (Ctrl+V), so that, anchored in the empty header paragraph, it repeats every time you insert a landscape page.
8) Set the position of the frame relative to the entire page.
Vertical position 2.80 cm (same distance as the left margin vertically).
Horizontal position: 1.50 cm (same distance as the bottom margin vertically).
9) If the footer has a line above the text, on the Borders tab, select a right border and specify the line width and spacing to the frame’s contents.
10) Click OK to save these settings. The footer will now appear in the required position and orientation on any page using the Landscape style.
11) Since rotated text does not allow tabs, click in the frame at the end of the text where the tab was, and type as many spaces as you need for the layout to match the portrait page.
Tip
To set up a portrait header on the landscape page, repeat these steps (from step 3) but set the horizontal position to 27.70 cm (29.7 cm, minus 2 cm from the margin and header).
Figure 34: Footers in place for both page styles
