
Chapter Template Guide 24.2
Chapter 00
LO Chapter Template Instructions
Create LO chapters using this template
This document is Copyright © 2024 by the LibreOffice Documentation Team. Contributors are listed below. This document maybe distributed and/or modified under the terms of either the GNU General Public License (https://www.gnu.org/licenses/gpl.html), version 3 or later, or the Creative Commons Attribution License (https://creativecommons.org/licenses/by/4.0/), version 4.0 or later. All trademarks within this guide belong to their legitimate owners.
Contributors for this edition:
B. Antonio Fernández
Peter Schofield
Steve Fanning
Contributor 4
Contributors for previous editions:
Flywire
Jean Hollis Weber
Olivier Hallot
Contributor 4
Please direct any comments or suggestions about this document to the Documentation Team Forum at https://community.documentfoundation.org/c/documentation/loguides/ (registration is required) or send an email to: loguides@community.documentfoundation.org.
Note
Everything sent to a mailing list, including email addresses and any other personal information that is written in the message, is publicly archived and cannot be deleted.
Published February 2024. Based on LibreOffice 24.2 Community.
Other versions of LibreOffice may differ in appearance and functionality.
Some keystrokes and menu items are different on macOS from those used in Windows and Linux. The table below gives some common substitutions used in this document. For a detailed list, see LibreOffice Help.
Windows or Linux | macOS equivalent | Effect |
Tools > Options on Menu bar | LibreOffice > Preferences | Access setup options |
Right-click | Control+click, Ctrl+click, or right click depending on computer setup | Open a context menu |
Ctrl or Control | ⌘ and/or Cmd or Command, depending on keyboard | |
Alt | ⌥ and/or Alt or Option depending on keyboard | Used with other keys |
F11 | ⌘+T | Open the Styles deck in the Sidebar |
IMPORTANT — Remember this is a STYLE template
While the text in this document provides some useful pointers about styling chapters for LibreOffice documentation, it is first and foremost a STYLES template used to create LibreOffice user guide chapters. It is NOT an alternative or a substitute for the Contributors’ Guide.
This chapter provides information and instructions on how to create and format individual chapters as stand-alone documents for LibreOffice documentation. The individual chapters are also used to create a LibreOffice user guide. This chapter template is similar to the template used for LibreOffice user guides.
When creating and updating chapters, ALWAYS use the styles provided in this template. NEVER apply direct manual formatting to text, figures, and tables using the tools that are available on toolbars, the Menu bar, or keyboard shortcuts.
These template instructions also outline what is covered in a chapter. Also, there is additional information to assist a writer in using a standard writing style required so that a chapter has the same format and style as other chapters created by other documentation writers.
Notes
All styles used to create a LibreOffice document are located in the All Styles category in the Styles deck on the Sidebar.
Styles already in use in a LibreOffice document are located in the Applied Styles category in the Styles deck.
Any custom styles created are located in the Custom Styles category and the All Styles category. When a custom style is used, it also appears the Applied Styles category.
When copying text for a LibreOffice chapter, always paste the text into the document as unformatted text using the option Edit > Paste Special > Paste Unformatted Text on the Menu bar. This prevents overwriting any formatting used in paragraph and character styles.
When creating a new chapter or updating a chapter, it is recommended to turn on Formatting Marks so that the paragraph marker is visible. This makes it easier to correctly position text, images and tables.
Chapter information is entered or updated using the chapter file properties as follows:
Guide Name: name of the user guide, for example Draw Guide.
LibreOffice Version: version number of LibreOffice, for example 24.2.
Month: the month of publication, for example February.
Year: the year of publication, for example 2024.
The required copyright information for the chapter is entered onto the Copyright page. This page follows the first page of a chapter. Make sure that the following are correct:
The table of contents (ToC) for a chapter uses the Front Matter page style and the paragraph styles Contents 1, Contents 2, and Contents 3 to create the index from the Heading 1, Heading 2, and Heading 3 paragraph styles. The ToC heading uses the paragraph style Contents Heading, which is not included in the ToC.
After inserting and updating the text, figures and tables in the chapter, use the following steps to update the ToC.
Create a new chapter, or update an existing, using this template by including the text, tables, graphics and the ToC. The template text, tables, graphics and table of contents have to be replaced to include the required information for the new chapter, or from the chapter being updated.
The following procedure is recommended as starting point when creating, or updating a LibreOffice user guide chapter.
Guide Name: name of the user guide, for example Draw Guide.
LibreOffice Version: version number of LibreOffice, for example 24.2.
Month: the month of publication, for example January.
Year: the year of publication, for example 2024.
Notes
When pasting text into a new chapter file, the command Paste Unformatted Text has to be used to prevent any overwriting of styles formatting already in use in the new chapter file.
The styles required to create or update a chapter using this template are located in the All Styles category in the Styles deck. Any styles already in use in the document are located Applied Styles category in the Styles deck.
The following page styles listed in Table 1 are used for creating a new chapter, or updating existing chapters.
Table 1: Page styles
Page Style | Style Description |
Default Page Style | Used for all pages, except for the First Page and Front Matter pages. |
First Page | Used for the chapter title page and is a right page only. Using a right page only creates the correct book format for printing and creating PDF files. The following page style is Front Matter. |
Front Matter | Used for the copyright and table of contents pages when the chapter is being created as a stand alone document. The following page style is Default Style. |
The following paragraph styles listed in Table 2 are used in the first page, front matter and contents pages.
Table 2: Heading styles for first page, front matter and contents
Paragraph Style | Style Purpose |
Contents Heading | Used automatically by LibreOffice to insert the word “Contents” on the Table of Contents page. This style prevents the Contents heading from appearing in the table of contents. |
Guide Name | Used to display the name of the user guide on the first page of a chapter. The following paragraph style is Title. |
Heading 1, Heading 2, Heading 3 | Headings 1, 2, and 3 are included in the ToC. All heading styles inherit attributes from the Heading paragraph style. Heading 1 has an underline using the same color as used for the font. |
New Chapter | Inserts a page break before the paragraph and changes the page style to First Page for the start of a new chapter. The graphic used for chapters is inserted at the New Chapter paragraph and the following paragraph style is Guide Name. |
Subtitle | Used for the optional chapter subtitle. This paragraph style has a page break after the paragraph to force the Copyright section to start on a new page using the Front Matter page style. If the chapter does not require a subtitle, delete the text, but DO NOT delete the paragraph because Subtitle is used as a page break. |
Title | Used for the chapter title in a user guide and is positioned below the guide name. The following paragraph style is Subtitle. |
ALL paragraph styles, except heading styles, have the option Do not split paragraph selected. This prevents paragraphs from breaking across two pages and creates a document with good format. However, care must be taken when creating paragraphs to prevent them from being too long.
The following guidance should be used for paragraphs:
Table 3 lists in alphabetical order all the paragraph styles that are available for creating and formatting text in a chapter.
Table 3: Paragraph styles
Paragraph Style | Style Purpose |
Body Text | The default style for any paragraph that is not formatted using a paragraph style. |
Body Text, Indented | The same as Body Text, with a 1cm indentation. This paragraph style is normally used after the Definition Term paragraph style. |
Body Text, Indented 2 | The same as Body Text, with a 1.5cm indentation. This paragraph style is normally used after the Definition Term 2 paragraph style. |
Body Text, List Intro | The same as Body Text with the option Keep with next paragraph selected. This option prevents the paragraph from being separated from the first item in a list when a list starts at the bottom of a page. |
Body Text, Note | The same as Body Text with a 1cm indentation before and after the paragraph. Used as a description after the paragraph styles Heading Note, Heading Caution and Heading Tip. |
Caption | Used as the basic formatting for caption paragraphs for tables, figures or code listings. The font is Liberation Sans Italic 11pt. Paragraph alignment is left. |
Code | Used when an entire paragraph is computer code, for example, lines of computer code. When code examples are entered into a document, there maybe some line wrapping due to the constraints caused by margins. To reduce line wrapping, the style uses Liberation Mono as the font, font size 10pt, and character spacing -1pt. |
Contents Heading | Used automatically by LibreOffice to insert the word “Contents” on the Table of Contents page. This style prevents the Contents Heading style from appearing in the table of contents. |
Figure | Used for the anchor paragraph for a graphic or image and the caption paragraph for a figure. This paragraph style inherits the formatting from the Caption style. The paragraph alignment is changed to center alignment and positioned below the graphic or image inside the figure frame. |
Guide Name | Used for the name of the user guide on the first page of a chapter. |
Heading 1, Heading 2, Heading 3 | Headings 1, 2, and 3 are included in the Table of Contents. All heading styles inherit attributes from the Heading paragraph style. Heading 1 has an underline using the same color as used for the font. |
Heading Note | Used when a note is placed in the text giving necessary information to a LibreOffice user. Heading Note is automatically followed by the Body Text, Note paragraph style. |
Heading Tip | Used when a tip is placed in the text giving helpful information to a LibreOffice user. Heading Tip is automatically followed by the Body Text, Note paragraph style. |
Legend Numbered | Used when a figure requires extra information as text in column format. It is placed directly below the figure caption and figure frame. Number of columns used depends on how many legend items are required. Normally, only 2 or 3 columns would be used for a legend. |
List | Creates a simple list of items that do not require any bullet points or numbering. Each item in the list consists of one line only and there is no paragraph spacing between list items. |
List 1 | Creates the 1st level of an unordered (bulleted) list using a bullet point and indented text. |
List 1 Cont | Continuation of a List 1 item in an unordered list and does not require a bullet point. |
List 2 | Creates the 2nd level of an unordered list using a bullet point and indented text. |
List 2 Cont | Continuation of a List 2 item in an unordered list and does not require a bullet point. |
Listing | Used to format a caption paragraph for a code listing. The Listing style inherits from the Caption style. It is left aligned and positioned above a code listing. |
New Chapter | Inserts a page break before the paragraph and changes the page style to First Page for the start of a new chapter. |
Numbering 1 | Creates the 1st level of an ordered (numbered) list using sequential numbering and indented text. |
Numbering 1 Cont | Continuation of a Numbering 1 item in an ordered list and does not require any numbering. |
Numbering 2 | Creates the 2nd level of an ordered list using sequential alpha numbering and indented text. |
Numbering 2 Cont | Continuation of a Numbering 2 item in an ordered list and does not require any numbering. |
Numbering 3 | Creates the 3rd level of an ordered list using sequential Latin numbering and indented text. |
Numbering 3 Cont | Continuation of a Numbering 3 item in an ordered list and does not require any numbering. |
Subtitle | Used for the optional chapter subtitle. The Subtitle paragraph style has a page break after the paragraph to force the Copyright section to start on a new page using the Front Matter page style. If the chapter does not require a subtitle, delete the text, but DO NOT delete the paragraph because Subtitle is used as a page break. |
Table | Used to format a caption paragraph for a table. The Table style inherits from the Caption style. It is left aligned and positioned above a table. |
Table Contents | Used for text in table cells. The text size has been reduced to 10pt so that more information can placed inside a table cell. |
Table Heading | Used for the cells in the header row of a table. The text size has been reduced to 10pt so that more information can placed inside a table cell. |
Title | Used for the chapter title in a user guide and is positioned below the guide name. The following paragraph style is Subtitle. |
For additional formatting within a paragraph, use one of the character styles described in Table 4. When formatting characters in a paragraph DO NOT use the formatting tools available on the toolbars, Properties deck on the Sidebar, or keyboard shortcuts.
Note
Character styles inherit the font size of the paragraph style. Do not set the font size in the Font options of the Character style dialog.
Table 4: Character styles
Character Style Name | Style Purpose |
Code | This character style uses the Liberation Mono font for examples of code words placed in a paragraph. The character spacing has been reduced by -0.5pt to reduce word length. |
Emphasis | This italics character style is a default character style in LibreOffice and is used for the following: |
Example | This character style uses the Liberation Mono font. It is a default character style in LibreOffice and used when the following are inserted into a paragraph: |
Keystroke | This custom character style uses Liberation Mono italic font and is used for keyboard shortcuts, key presses, and key combinations, for example Shift+Tab. |
Strong Emphasis | This bold character style is a default character style in LibreOffice. Use it for terms that are commonly printed in bold and for the following: |
When creating ordered and unordered lists, the list points are created using the following guidance:
Ordered lists are also known as numbered lists. The first item of each level of every ordered list in a document, the numbering has to be restarted. The numbering styles that available for use are as follows:
Numbering 1 — 1)
Numbering 2 — a)
Numbering 3 — i)
The numbering of the first numbered list item in each level of an ordered list has to be restarted each time an ordered list is created. This prevents the numbering of ordered lists for continuing as ordered lists are created in a document. Restarting the numbering can be carried out using the Paragraph dialog or the context menu.
Note
Numbering restart must be carried out on all levels of numbering used in an ordered list.
When creating another ordered list in the same chapter, numbering restart can also be carried out as follows using the context menu.
An example of a numbered list with three levels of numbering is as follows. Please note, that the Numbering 3 style is only used when really necessary.
Use Numbering 1 Cont style if further explanation is required in a Numbering 1 item.
Use Numbering 2 Cont style if further explanation is required in a Numbering 2 item.
Use Numbering 3 Cont style if further explanation is required in a Numbering 3 item.
Unordered lists are also known as bullet lists and there are two levels of list items using the styles List 1 and List 2. An example of an unordered list used in LO chapters is as follows:
Use List 1 Cont style if further explanation is required in a List 1 item.
Use List 2 Cont style if further explanation is required in a List 2 item.
Simple lists use the List paragraph style and do not have bullet points or numbers. Use simple lists only when the list items are no longer than one line of text, as shown by the following example:
List paragraph style
Space below is only added when a different paragraph style is used.
List paragraph style
The spacing below the paragraph is only applied when the following paragraph uses a different paragraph style, for example Body Text.
Definition lists are used mainly for short explanations of terms that may not be familiar to a user, for example, fields or options in dialogs. There are two levels of definition terms because some dialogs have main options and sub-options available for selection. Each item in a definition list consists of two parts as follows:
An example of a definition list is as follows:
Definition Term
Definition Term 2
Text Body Indent 2 paragraph style
Optimize
Minimal Column Width
Defines the minimal column width for selected columns and depends on the shortest entry within a column.
Minimal Row Height
Determines the minimal row height for selected rows and depends on the font size of the smallest character in the row.
Merge Cells
To have consistent styling and anchoring for all types of graphics and images shown in LibreOffice documentation, the following steps are the recommended procedure when creating figures. Figure 1 is an example of a correctly inserted figure.
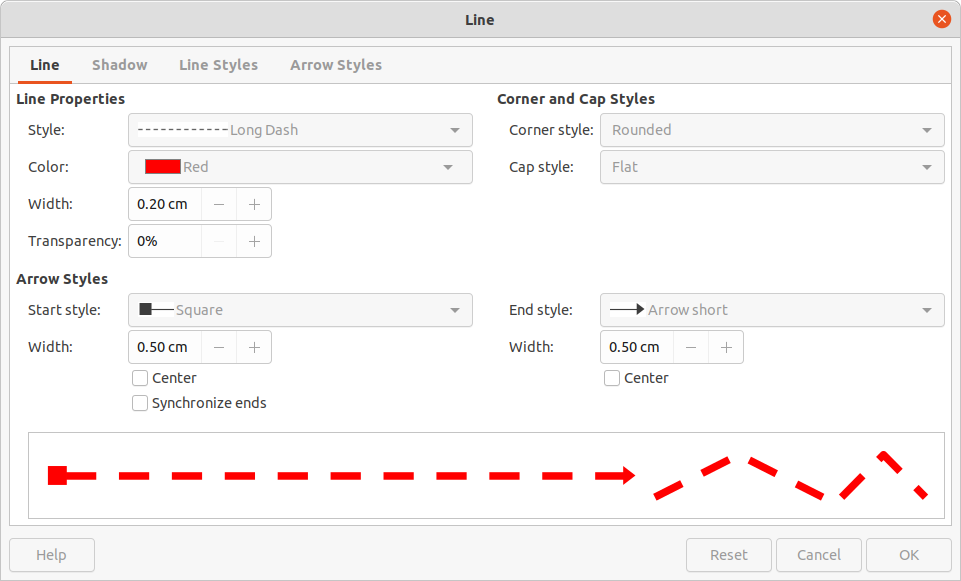
Figure 1: Example figure of a LibreOffice dialog
Note
Figure captions have to be as short as possible and only consist of one line. For example, this caption is too long “Figure 22: Tab Position and Size of the Frame dialog box, showing vertical alignment to Top of the Base line.” The caption should be “Figure 22: Tab Position and Size of the Frame dialog box.”. The extended explanation is placed in a paragraph where the figure cross reference appears.
Category is set Figure.
Numbering is set to Arabic (1,2,3).
Position is set to Below.
Open Image properties dialog and click on the Options tab to open the Options page. In Accessibility, enter a Name, Text Alternative, and Description in the text boxes.
Note
For accessibility, graphics and images must have a Name, Text Alternative, and Description defined. Refer to LibreOffice help for more information at https://help.libreoffice.org/7.6/en-GB/text/swriter/01/05060900.html.
When a figure has been placed into a document, the figure normally consists of three parts:
Depending on the size of the image or graphic used as a figure, the figure may have to be repositioned or resized in the document to achieve a good formatting result leaving no large blank spaces on pages.
When positioning a figure on a page, it is normally placed on the same page as the cross reference in the text for that figure. This figure position can be either at the top or bottom of the page, depending on where the cross reference appears on the page.
To prevent blank spaces appearing in the pages, figures can be placed on the previous or following page to the cross reference. If the cross reference is in the upper half of the page, the figure is placed at the bottom of the previous page. If the cross reference is in the lower half of the page, the figure is placed at the top of the following page.
However, some figures are small in size, for example a small toolbar (Figure 2). These small figures can be placed immediately below the paragraph containing the cross reference. Occasionally, positioning small figures immediately below a paragraph may create a blank space. This can be resolved by positioning the small figure above the paragraph.
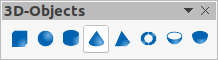
Figure 2: Example small toolbar
Sometimes it is necessary to resize a figure to achieve good page formatting. The graphic or image and figure frame are normally resized as one item. However, the graphic or image and the figure frame can also be resized independently of each other, so care must be taken to make sure the figure frame is selected when resizing. The graphic or image inside the frame automatically resizes when the frame is resized.
The captions used for a figure should be meaningful and as short as possible consisting of one line. However, if a caption does extend to multiple lines, the following procedure creates a single line caption. Figure 3 shows an example of a multiple line caption. Figure 4 shows the same caption, but is now a single line.

Figure 3: Line transparency (0%, 25%, 50%, 75%)
Figure 4: Line transparency (0%, 25%, 50%, 75%)
When text (NOT a caption) is added to a graphic or image (Figure 5) and the whole figure is then converted to a graphic format (for example PNG), the text becomes part of the graphic or image. making the text very difficult to translate into another language using modern translation methods.
The solution is to create a numbered legend and place the legend immediately below the figure, as shown by the example in Figure 6. The paragraph style used for a legend is Legend Numbered. Remember to restart numbering when creating a new legend.
The legend shown in Figure 6 is in column format and the number of columns used does depend on how many legend items are required for a figure. Also, the legend text is editable and can been translated into another language using translation software.
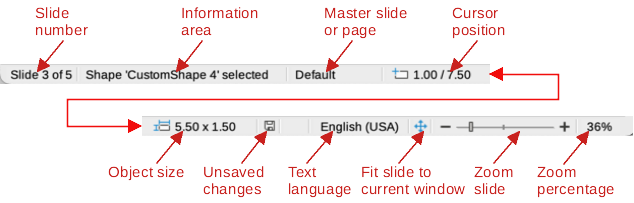
Figure 5: Example of a text legend
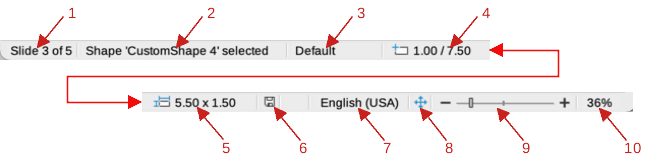
Figure 6: Example of using a numbered legend
When multiple columns are required for the legend, the following steps are used to create the column format:
Note
When there is more than one legend in a chapter or user guide, the numbering has to be restarted for the first item in each legend. See "Ordered (numbered) lists" on page 1 for information on restarting numbering.
Tables are used to explain data in a tabular format and an example table is shown in Table 5. This table uses a table style called LO User Guides and is used for all tables in LibreOffice user guide chapters.
Table 5: Sample table using Table paragraph style for this caption
Windows or Linux | macOS equivalent | Effect |
Tools > Options | LibreOffice > Preferences | Access setup options |
Right-click | Control+click, Ctrl+click, or right-click depending on computer setup | Open a context menu |
Ctrl or Control | ⌘ and/or Cmd or Command, depending on keyboard | |
Alt | ⌥ and/or Alt or Option depending on keyboard | Used with other keys |
F11 | ⌘+T | Open the Styles deck in the Sidebar |
The LO User Guides table style sets the alignment, table width, and table borders. The table style is applied as follows:
Note
For clarity when using tables, table rows should not break across pages and columns. If a table cell contains too much data that forces a row onto the next page leaving a large blank space, then rethink the data.
A header row is created as follows and automatically repeats on following pages when the table breaks across multiple pages.
Category is set Table.
Numbering is set to Arabic (1,2,3).
Position is set to Above.
Table Contents
Table Heading
Table
To create a Note, Tip, or Caution:
Note
A note is used when something has to be drawn to the attention of the user and possibly prevent any user errors. A note begins with the paragraph style Heading Note. The text of a note uses the paragraph style Body Text, Note and automatically follows Heading Note.
Tip
A tip is a suggestion that could make it easier for a user to do something easier and better in LibreOffice. A tip begins with the paragraph style Heading Tip. The text of a tip uses the paragraph style Body Text, Note and automatically follows Heading Tip.
A caution is only used when there could be serious damage to the file or software if the user does not follow the correct procedure. Before using a caution in the user guides, make sure that it is really required.
A caution begins with the paragraph style Heading Caution. The text of a caution uses the paragraph style Body Text, Note and automatically follows Heading Caution.
Always use the cross referencing tool in LibreOffice when there is a requirement to refer to a heading, figure, table, or listing within a document. The cross referencing tool keeps track of where the referenced item is positioned within the document. This is important, especially is a referenced item is moved, additional figures or tables are added to the document, or figures or tables are deleted.

Figure 7: Cross-references page in Fields dialog
Numbering for figures, tables, and listings.
Referenced text for headings.
Page number (unstyled) for page numbers, if required.
Note
A cross reference to a page number is required if the item being referred to is not on the same page, the immediate page before, or the immediate page after, and for all cross references to headings.
DO NOT use the terms “above” or “below” for a cross reference. The position of a referenced item can easily change when chapters are amended or updated.
Listing 1 is an example of code with the Code paragraph style applied after insertion into a user guide chapter. The spacing below a code paragraph is not applied until there is a paragraph style change, for example Body Text.
Notes
When examples of code listing are inserted into a document, there maybe some line wrapping. Allow the line of code to wrap to the next line. DO NOT insert line breaks because line breaks prevent the code from operating correctly.
The Code paragraph style changes the font to Liberation Mono reducing the font size to 10pt and character spacing by -0.5pt. This change allows for longer lines of code to be inserted into a document reducing the amount of line wrapping.
Listing 1: Example of a code listing
sub EnterMyName rem ------------------------------------------------------------- rem define variables dim document as object dim dispatcher as object rem ------------------------------------------------------------- rem get access to the document document = ThisComponent.CurrentController.Frame dispatcher = createUnoService("com.sun.star.frame.DispatchHelper") rem ------------------------------------------------------------- dim args1(0) as new com.sun.star.beans.PropertyValue args1(0).Name = "Text" args1(0).Value = "Your name" dispatcher.executeDispatch(document, ".uno:InsertText", "", 0, args1()) end sub |
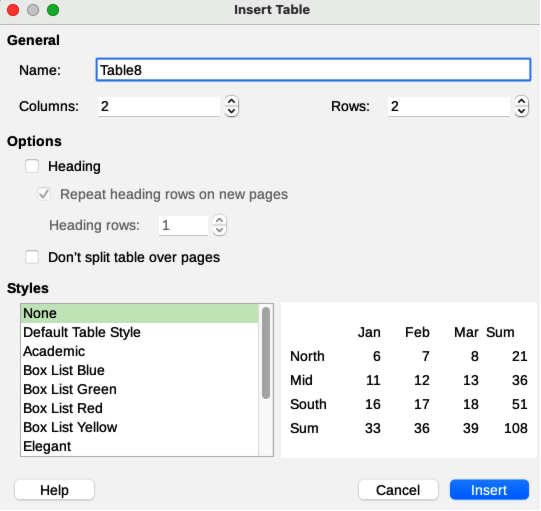
Figure 8: Insert Table dialog
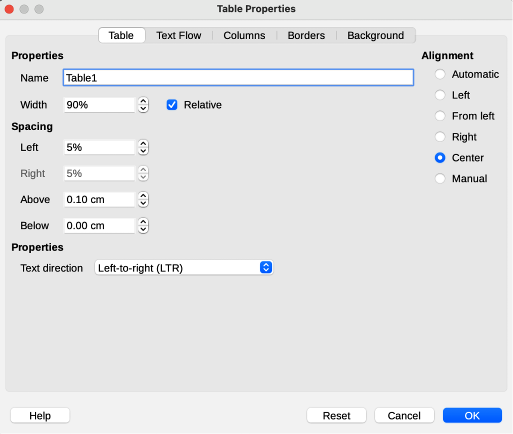
Figure 9: Table Properties dialog
Use the following procedure to insert a blank table cell and a code listing into a user guide chapter:
Note
The paragraph spacing below a line of code is not applied until there is a paragraph style change, for example from Code to Body Text.
If required, the words in a code example can be highlighted to indicate the function of the code words. To format the characters, the Code Highlighter extension has to be used. This extension is not installed during the installation of LibreOffice application and has to be downloaded from the LibreOffice website.
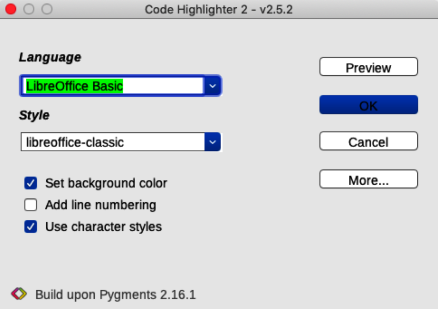
Figure 10: Code Highlighter dialog

Figure 11: Code Highlighter dialog — More page
Note
The code character styles that have been applied will appear in the Custom Styles section in the Character Styles panel of the Styles deck on the Sidebar.